I recently worked out just how many cities you should have for a science game, a number that seemed to converge around 10. My fast Shoshone and Babylon games were near that; my slow Rome games way off. Now I'll attempt a game that should be able to dial in just-right on city count.
I'm also going to try a suggestion given by chumchu in the Realms Beyond thread: Use Poland and their free policies to complete both Tradition and Liberty. Poland cuts that knot and just answers "why not both?" The plan is to start with Liberty to Republic and Collective Rule, then all of Tradition.
I was skeptical of this approach at first. Poland should be using their power to complete Tradition super early (~turn 60 after 5 normal policies plus one freebie); a three-deep diversion to Collective Rule pushes that back to around turn 100 (the 7th normal policy plus the second freebie.) Just that delay in the Tradition finisher accounts for missing out on more food than Collective Rule will ever produce hammers. But the more I thought about it, this started to seem like a good idea. Poland's freebies don't really shine anywhere else; they can only get a slightly deeper dip into Patronage or Commerce or Piety while waiting for Rationalism to open, but there's no huge swings to be had there. Liberty might be as good as anything else. Front-loading production into Collective Rule does matter, and Republic is quietly strong as always.
This move is the clincher: Don't finish Liberty, but save the finisher for endgame, an extra Great Scientist after all the normal production is complete. That's a big swing, equivalent to half of Babylon's civ ability. And the timing works perfectly. You almost always get 9 policies (including the Oracle) before Rationalism opens (6 Tradition + 3 Commerce is my usual.) Poland adds two freebies before Rationalism opens, a total of 11 policies, just right to finish Tradition and stop one short of Liberty.
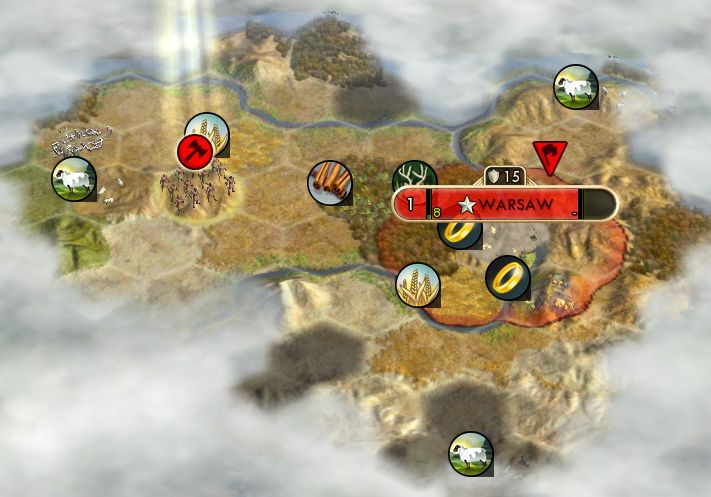
Pretty good start. Nice cluster of resources, and importantly three hills (on the east side) plus a deer camp for the starvation settler phase. And it's not shown here, but there was also a horse that appeared on turn 1 by popping Animal Husbandry from that ruin. Mining first of course, to sell the gold under the city and mine the other and the hills. (Mining hills early is a higher priority than farming when you'll be going on to starvation settlers.)
Build order: 4 scouts - monument (you need this when not starting with Tradition) - worker - archer - archer - settler - settler - settler - settler - settler - settler - settler - settler.
I was near the southwest corner of the map just like the Rome tall game, so the build order was four scouts, as the starting warrior (ruins-upgraded to spearman) made an exploring loop into the corner then returned home for defense.
And as those scouts explored, once again, BAM:
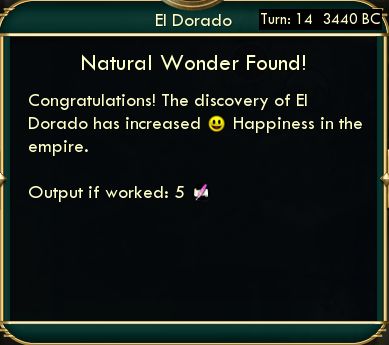
Just as in all my big games, boom, El Dorado. Except... something's missing. I didn't get the 500 gold!
Byzantium beat me to it by what looks like one turn! Hah. Oh well.
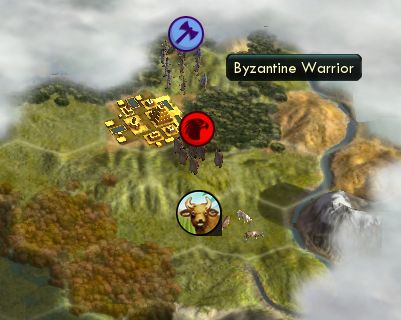
Looks like they bought a CARAVAN with it, which has to be a spectacularly terrible choice. What could a trade route possibly be worth this early, like 2 gpt? Anyway, it amusingly helped me out too as I followed it with my scout to find and contact the city-state that had to be on the other end. It also helped me that they had money (4/turn) to buy my gold resource now on turn 16.
Anyway, ruins yielded Animal Husbandry, the spearman upgrade, turn 7 culture and we're in business, t9 survivors to size 3 (actually delayed picking up this ruin by one turn in order to naturally grow to size 2 first), barbs, map, 50 gold, t16 survivors to size 4 super nice, Archery, another map...
")
It's turn 20 and time for faith. I deliberately left that one an extra turn to pop at the right time. I got excited on getting 20 of something, but it was only culture, but still welcome.
Presently I started getting really antsy about Desert Folklore. Five or six pantheons had now come in over the next few turns, pushing the cost way out of reach by shrine, the only option would be that mystical faith ruin. Two more ruins yielded barbs and an archer upgrade. Then:
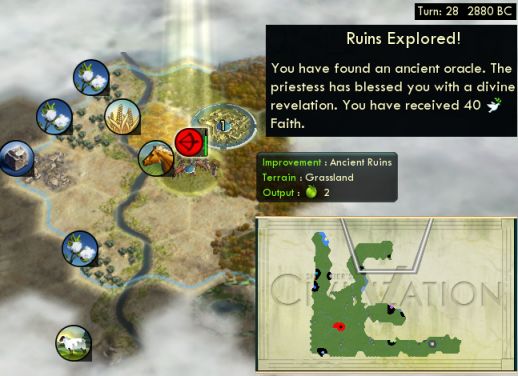
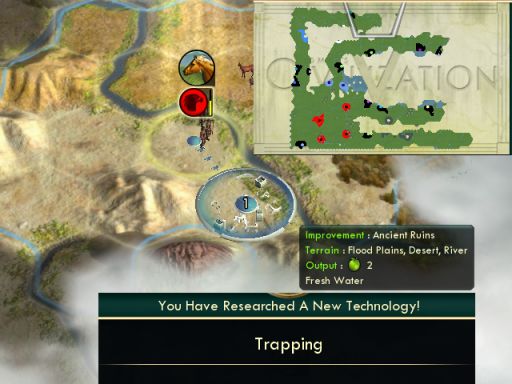
Finally got it here on turn 28. Actually I never saw 40 faith before. I know the number goes up and have frequently seen 30, but never 40. I guess it always yields enough to get your pantheon. The next ruin (turn 32) yielded a super helpful survivors to size 5, then assorted later ones contributed more gold, Trapping, big faith towards the religion, and Bronze Working.
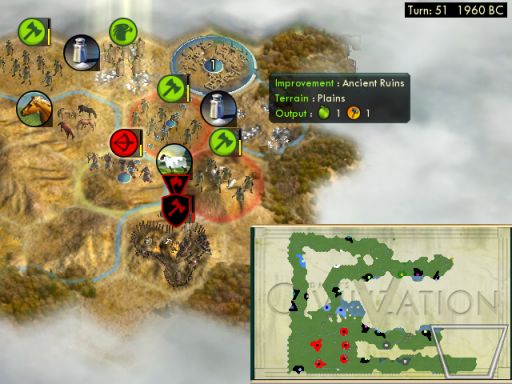
The previous picture shows my map layout, looks like we've got plenty of space here in this corner with neighbors far away. Enough resources to work with and enough desert for Folklore once we actually got it. I built a worker and saved enough money to buy another, both on turn 24, slightly slow but good enough.
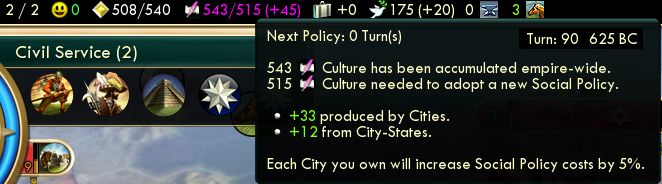
The policy in that picture would be Republic on turn 20, and Collective Rule followed soon on turn 30. Yes, this was correct. I really can't understand why people say to do the Tradition opener before entering Liberty. It just doesn't pay for itself, you don't get to Collective Rule faster or to anything else. That fourth policy costs 105 culture which takes dozens of turns for the 3/turn to repay. Anyway, we're just about ready to start on the starvation settlers...
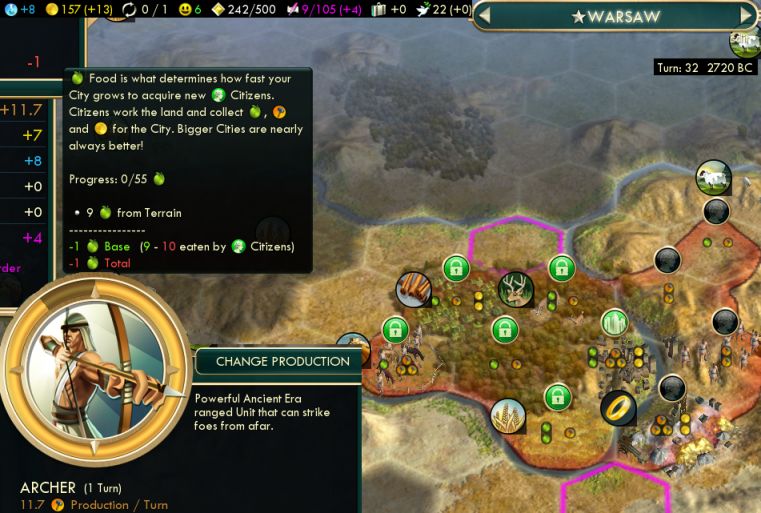
Except for this wrinkle. I just hit a ruin to grow to size 5... one turn too soon before that archer completed. But I can't complete it now -- there's no food available anywhere, it's impossible for the city to find 10 food from its tiles without starving! I could buy the flood plain, but that seemed shortsighted, $50 for just 1 food this turn and then it's useless while building starvation settlers.
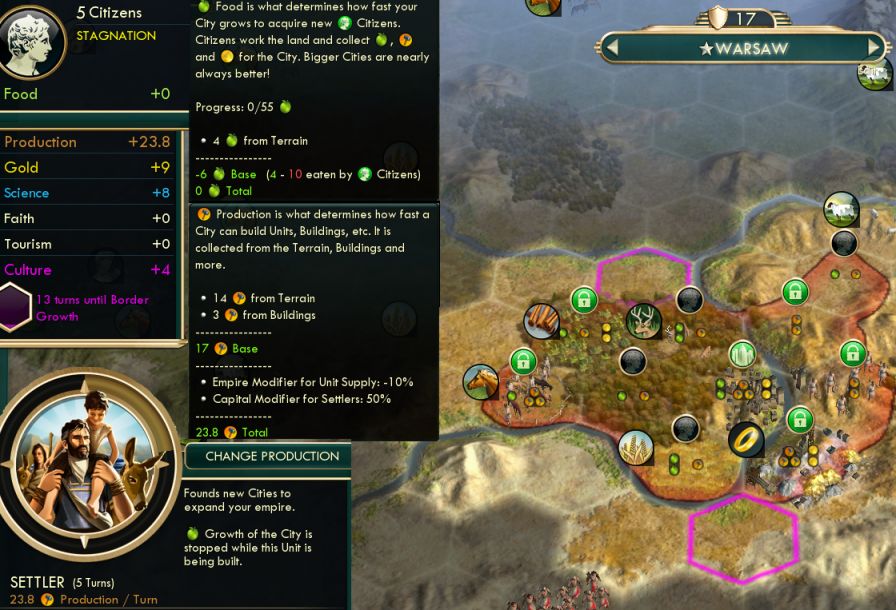
The answer had to be to start on the starvation settlers right now, leaving the archer paused in the queue until we could farm the wheat some time (15 turns) later to avoid starving. But anyway, this is a pretty decent implementation of starvation settlers. 23.8 hammers now (should be 25.5 if not for that dumbass unit-supply penalty) and would come up to 28.5 with more mines. That shot out all the settlers super fast at 4 turns each or occasionally even 3 with overflow.
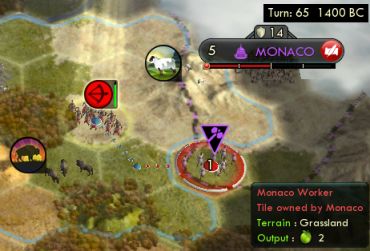
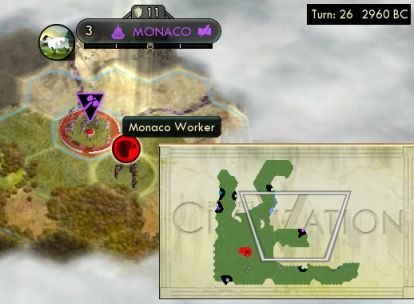 Stole a worker nice and early, turn 26. Took him a while to get home unescorted, though.
 This is a
 cheat/exploit/loophole/trick I've used but haven't mentioned yet here. CFC calls it "radaring". With a noncombat unit selected and holding right-click to move, the cursor will turn red without a number to indicate the turn count when you are hovering over an enemy unit in the fog. I can know from four tiles away there's a barbarian on that particular hex, and navigate around it.
 Another trick: stay at war with the same city-state long enough to steal a second worker. You get nasty diplomatic penalties for the second and later times you declare war on any city-states, but there's no consequence to declare once and keep that single war going. To steal the second worker, make sure your camping unit is positioned 2 tiles away from the CS's borders so they can't see it, and they'll eventually walk that worker into you.
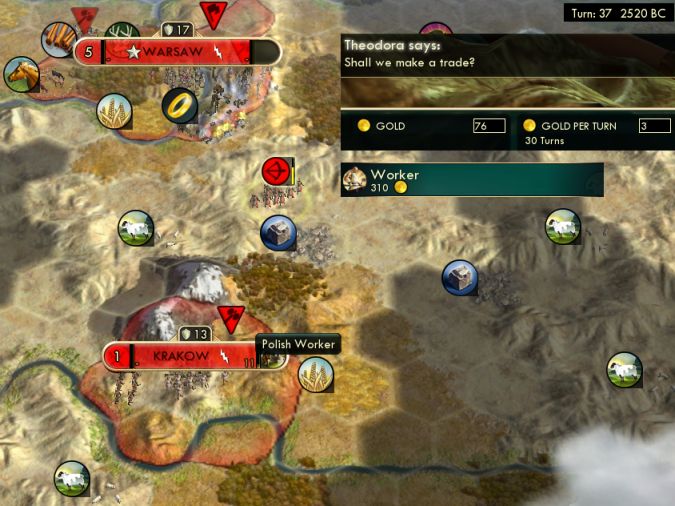
City two, not because this is the best city site in range (not even close), but because that's the direction my military is currently in to escort it (the spearman is left of Krakow.) Theodora had just friended me and conveniently lent me the money to buy that worker right when I needed it now. Maria of Portugal also did that a bit later.

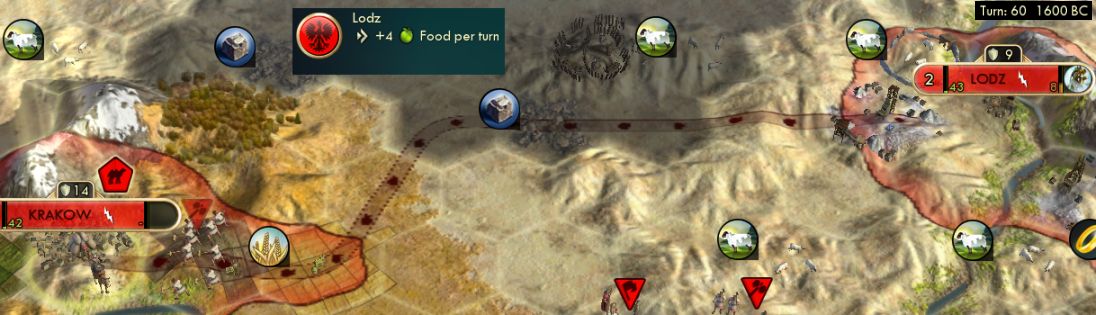
And a view just a few turns later, as Warsaw rapidly churned out all those settlers. That's Uluru at Wroclaw, the 6 faith/turn would go a long way towards making up the somewhat slow Desert Folklore start. The religion would come in reasonable time on turn 57, assisted by one big faith ruin. Also notice all those mountains (including Uluru): cities #2 through #6 (north by the marble) would all be observatory eligible for the later game.
What I was really pleased with was how the workers came together to supply each city. I'd bought and built one each at Warsaw early on. Bought the one at Krakow with Theodora's money. The stolen one from Monaco is at Lodz. Bought again at Wroclaw with Maria's money. Poznan's worker is one from the capital which walked over there once the capital's tiles were done. Same for the one currently heading north to what will be the sixth city.
Techs: I started with the four first-level techs, then Calendar for spices and Wheel - Mathematics to get Poland's policy, then had to divert to Masonry for marble and Writing for libraries before Currency for Petra. Policies: the one available in the picture would be the Tradition opener and we'd continue through that whole tree.
Lodz is there for a spectacular Petra spot with more desert hills than it could even grasp by the end of the game. Krakow's job was to prepare Lodz for that. It built a granary and caravan to send food to Lodz.
This ran into a problem though. A barb camp spawned between the cities, and the game stupidly wanted to run the trade route right past it. Even after that settler there founded his city, the game didn't care about routing the caravan through safer territory and kept the determined route on that same alignment. I held off on the food caravan for several turns until I thought I had control of the barb camp, then established it. But that led to this:
The barb camp spawned that spearman, which screwed up my plan to clear it. What I actually had to do here was sacrifice my own spearman. I moved it as indicated, to get the barb spearman to attack and kill it but move itself off the trade route and into shooting range from Szczecin there. This was worthwhile, even though replacing the spearman would be a hammer cost, replacing the caravan would be worse, that loss wouldn't just be the 75 hammers to rebuild it but also the missing food while the trade route wasn't operational.
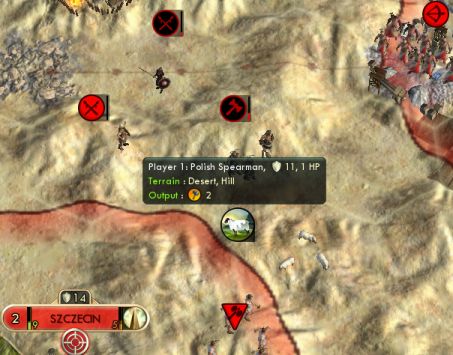 Well, my intention had been to sacrifice the spearman, but he miraculously survived at 1 health! So now Szczecin shot down the warrior, my archer got the spearman, and my spearman cleared the camp, saving my trade route.
Not much to do with the narrative, but I can never resist relating how late ruins stick around on Inland Sea. There's Trapping from that one, helpful. But what in the world is going on with that Brazil army over there? I get that they're attacking the barb camp for the settler, but how the hell did none of them even by happenstance walk onto that ruin? Well, it yielded barbarian camps, did the AI know that to avoid it?
Expanding to ten cities within 70 turns crunched hard on happy, of course. I got a major turning point here with a camp clear for Antananarivo here, plus also retrieved that second worker. That's 10 happy from the mercantile's two luxuries plus its own yield. I do hate relying on mercantiles for happy, since you never truly have it, you only rent it, and it tends to run out just as you're in a tight spot (because you're always in a tight spot.) But I had to take advantage of it here, and did have a good 60 turns worth of alliance banked, and it would turn out later that I'd get some easy quest to maintain that further.
")
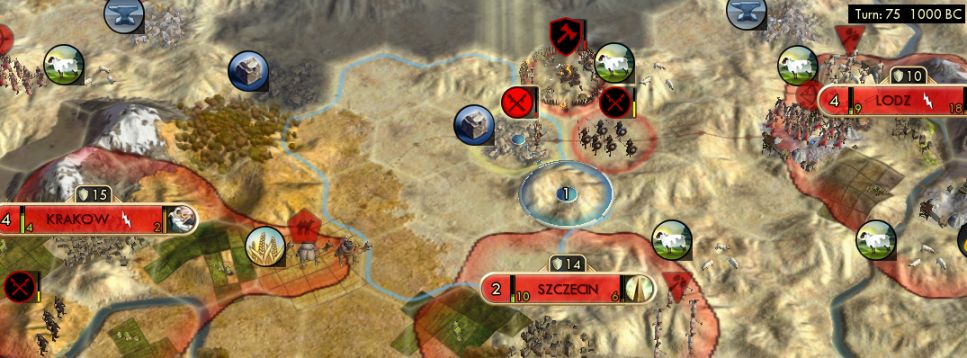
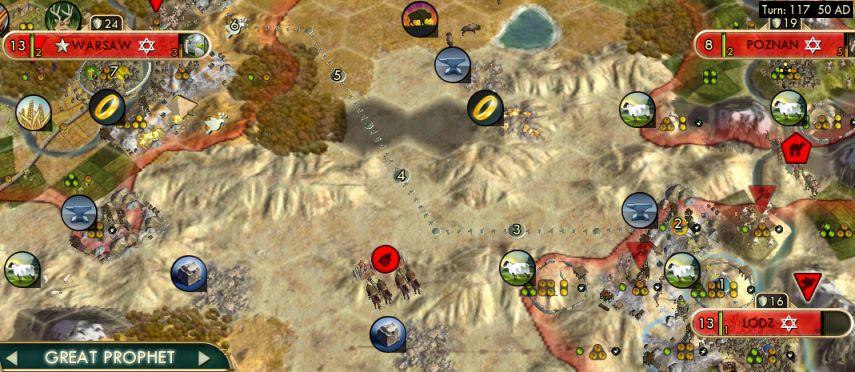
And the usual 1000 BC wide overview. Turn 75 and I have all ten cities planted, actually they got down by 70, that's faster than even my Shoshone game did it, thanks to Collective Rule.
Petra is making good progress at Lodz. And Warsaw was able to grab the Pyramids. Three other civs were in Liberty. I had embassies with two of them to see they weren't building the wonder. I couldn't get the third embassy (couldn't pay 1gpt for it with my income stuck in the negative) but took the gamble and got it.
Notice how the newest (western) cities are all going library first. This was my attempt to fix the research rate up to Education that had been lacking in the Rome wide game. Besides the libraries themselves, I'd also be in position to do the National College in Warsaw reasonably soon. That didn't get done in time to speed Education, but it made a noticeable difference after that through the Renaissance to have the NC operating during the university/garden phase rather than waiting until after those.
What isn't going right is worker labor for those new cities. I was so pleased before at getting workers for the first six cities, but that crashed hard after that. My income just completely dried up once I had to stop selling my luxuries and so I couldn't buy any more. The Pyramids and another retrieved barbarian worker would fix the labor problem, but connecting the ivory at Bydgoszcz and marble at Kaunas still took 15 turns longer than I wanted thanks to the lack of workers and presence of barbarians.
Yeah, barbarians. Major headache here, more than usual. Because my cities were spaced out just enough that camps could appear in the cracks between them. I unusually built two chariot archers as the best way to cover large swaths of ground.
Petra came in just fine. How spectacular is this city - every single tile it would ever work throughout the entire game will have the Petra bonus. Plus five sheep on top of that. One constraint with Petra cities can be expanding borders to the desert hills -- but that was no problem here when every single tile is a desert hill!
Although I couldn't bid for the Hanging Gardens this time. Three civs were in Tradition, and Sweden's capital had shown it under construction for a while.
So what I did instead was send all my trade routes for food to this city. Especially once it got We Love The King Day. Turns out that food caravans do get multiplied by that and the Tradition finisher (and functionally also the aqueduct), even though production and gold caravans don't get the city multipliers. Yet another rough edge in Civ 5's design. Anyway, this move felt correct. Usually I use the food trade routes to bring later cities up to size and strength, but they had all gotten founded fast enough with Collective Rule that that didn't feel necessary here. The best value of the caravans sure did seem to be food to Lodz here, where they would be highly multiplied, and the growth would be onto Petra hill tiles.
Also stemming from the early-developed cities was that I found myself with money and nothing urgent to spend it on. I sold some extra copies of luxuries once the workers finally got there, and suddenly found myself with 500 gold and not knowing where to put it. Had enough workers, done with settlers. No particular city was desperate to buy a library or watermill or any such. Often at this stage of the game aqueducts are the purchase target of choice, but this time I was going to Civil Service and Education and all the way to Astronomy before Engineering. What I found to buy was the Stable in the Petra city, since it was working four sheep and would be busy on wonders for a while. Actually then most of my money went into buying tiles: more gold and sheep and oasis for the Petra city, and also both of the iron near Warsaw.
Also contributing to the cities' development was Civil Service on turn 92, and specifically that I'd planned ahead and had many farms already in place. Sometimes I forget this and build all the mines first and find myself lagging on taking advantage of the Civil Service food, but I got that right here. Babylon had CS earlier at turn 80, but actually the raw date to CS isn't so important if you didn't have the cities founded early with worker labor to build the farms. This game got that right.
All these cities built their granary, library, monument, watermill, even stables before universities came available. I even had enough of a lull to build some shrines. They're weak but not quite completely neglectable. When buying Pagodas, one faith is actually worth a bit more than one hammer: it's like a colosseum (2 happy) plus a monument (2 culture) plus a temple (2 faith), which is 240 hammer value for 200 faith. So a shrine at 40h for 1 faith has a payback period somewhere south of 40 turns, which is slow but can come to the top as the best build option after better ones are completed.
Also contributing was this maritime city-state next door, that I easily allied with a camp clear and worker retrievals. It turned out that this was the one and only maritime on the whole map! But I guess one maritime alliance is about the usual amount anyway.

Culture production came in faster than I'd anticipated. I had expected Tradition to finish around turn 100 with the 7th normal policy. That policy actually came on turn 90, and the finisher via Poland's medieval freebie on t92. That 45/turn feels like quite a lot for this stage of the game. Turns out that the real star that accelerates into other policies isn't the Tradition opener, it's the Liberty opener. That 10/turn with 10 cities is something you don't have in just Tradition games, and actually did make a difference. I also had the Writers' Guild specialists unusually early, that typically waits until after universities, but my fast-founded cities had done enough infrastructure and growth to do the guild as soon as we got the tech.
The full schedule through Tradition: t50 opener, t52 (Poland's classical freebie) Oligarchy, t63 Legalism, t77 Monarchy, t90 Landed Elite, t92 (Poland's medieval freebie) Aristocracy and the finisher. Next up was t101 Citizenship back over in Liberty, and then things got interesting.
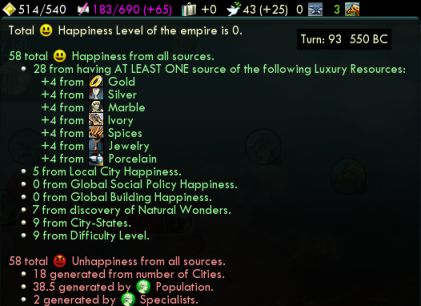 First, I carefully managed the happiness total as close to 0 as I could for a good dozen turns. I even declined to buy a pagoda for a turn when I didn't have a city growing to consume the happy.
 The purpose of this was to delay the happiness Golden Age. Don't let that counter reach 540. Don't let it tick up more than 1 on any turn if at all avoidable. Why? To complete Chichen Itza first to tack on the 50% extension. That's cool, but I've done that before, and yes there's more to it this time.
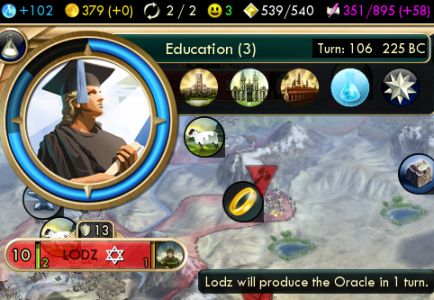 Then came the Oracle, timed exactly on the same turn that the happy GA would also trigger.
 The Oracle claimed Representation, which is another GA...
 ... which all added up to 30 consecutive turns of Golden Age! Timed perfectly, with the cities up to size to take advantage of it, and to build exactly the most critical item of the game in universities.
Note that everything had to go in that order, starting with Chichen Itza. Then the happy GA must come before Representation, or else the latter escalates the cost requirement for the former and you never get there. So there's a neat trick that nobody but Poland would have pulled off. Nobody else would be in a position to claim Representation in this tight time window squeezed between Chichen Itza and the happy Golden Age.
 From my original worker-steal, I actually stayed at war long enough to swipe not just a second worker, but also a third. Past turn 100 is rather late for that to matter though, probably should have just signed peace earlier to let the influence recover.
 Oddly, though, the influence didn't stay at -60 but reset to 0 (then -6 for trespassing on that turn.) No idea why this happened. And in fact then Monaco asked for a quest to spread my religion and we became friends anyway thus ignoring three millennia of war.
I had debated for a while whether to leave Representation or Meritocracy as the unclaimed policy to delay the Liberty finisher to endgame. Ultimately I decided I wanted Rep, while I could get by without Meritocracy. Part of that was culture going too fast. I would actually come all the way to a 12th total policy just 5 turns after Education, which is too fast, can't get to the Renaissance for Rationalism by then.
So Rationalism would get started one policy later than I usually manage, so I felt Representation's discount was necessary to catch back up. It's significant, reducing policy costs from 145% of base to 130% on a huge map. I always harp on how nothing that produces culture can ever make back up for its own policy cost, but what can is discounts, because that does keep pace with the exponentially increasing costs.
And the silver lining of when this happens (one policy a bit too fast before the Renaissance) is you end up cleared to spend a bit more time researching to a more useful Renaissance entry point than Acoustics. Here that would be Astronomy and so I'd very smoothly proceed from universities to gardens to the six observatories, all under that eternal Golden Age.
That surplus 12th policy itself would go for the Commerce opener. The other option was Patronage, but I wasn't doing much with city-states, and it was possible I'd resume Commerce later up to Mercantilism if the policies kept flowing as fast as they had been.
")
The 1 AD overview. Education had come in on turn 107, just about on par with the other fast games, and my cities built the universities and gardens and then observatories all quickly.
That's Hagia Sophia at Lodz. For the enhancement prophet. I couldn't ever take a break away from buying pagodas to do that instead, with happiness still tight. Also I wanted to keep buying as many pagodas as possible before the Renaissance cost bump. (And now that I did this here, I think Hagia for the enhancement prophet actually should be my standard move. I always want to wait until after the enhancement prophet so you can get 500 faith value from the Hagia instead of 300. But that's overthinking it. If using faith towards pagodas instead of a prophet will fit two more pagodas in the medieval age instead of the renaissance, that saves 200 and makes up the difference. So overall I really should build the Hagia ASAP.)
Oops, whoa, he can only enhance from the holy city, 7 turns to walk there!
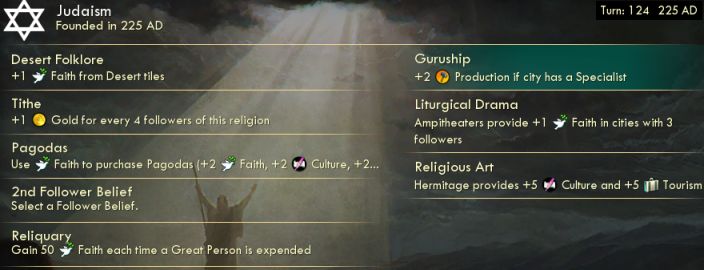
Anyway, enhanced on t124 for... oh wow crap, waited too long, Religious Community was gone, had to settle for Guruship. Also there is an unusual enhancer belief there, Reliquary. Religious Texts was available, but I really didn't need it this time. My civ was sitting compactly in our corner, with very little surface area to project any religious pressure onto. Religious Texts would convert hardly anything. So I decided to try out Reliquary instead. I never realized this before, but Reliquary got a boost in BNW, by way of all the extra writer and artist great people. Those plus the usual dozen scientists should make Reliquary add up to an extra engineer or even scientist in the end game.
Presently I did finish buying all ten pagodas, so then went on to another prophet at 500 faith. He would go out fulfilling a number of religion quests at city-states.
On turn 122 arrived Astronomy and the Renaissance. I had a policy coming to get both the Rationalism opener and Secularism via Poland's freebie all this same turn. I wrote before that Humanism should come before Secularism, but now I changed my mind. Humanism is only 1.5 GPP/turn, a total of only 15 in the 10 turns before you would get it next anyway; that's only half a turn of endgame GPP value towards the last great scientist. And actually Secularism even does make back up a bit of that GPP deficit by reaching the Leaning Tower and the World Congress/Sciences Funding a couple turns sooner as well, and maybe even schools by a turn.

I got to take advantage of the trick I previously discovered that the Dutch AI will sell you their last copy of a luxury for half-price thanks to their civ UA of retaining half its happy. I overpaid for silk here in order to get 3x WLKTD (including importantly at the Petra city) and a city-state quest out of the deal too.
The next milestone was the World Congress, on turn 132, just one turn slower than Babylon had gotten it. That went exactly as usual with no incident, rotating around the diplomats to pay for enough votes. I smartly wrote down which civs had objected to the resolution and sent diplomats to only the others.
 Remember that 30 turn Golden Age before? Turned out that it came just shy of being 81 consecutive turns. First the original GA lasted until the first great artist spawned, to keep it going.
 And that lasted to just two turns shy of the second great artist. That in turn made it to the Taj Mahal, which in turn lasted to the third artist, which continued until victory. 75 of the last 77 turns in this game were spent in Golden Age. Chichen Itza is more worthwhile than I've realized.
")
It seems like every game has a slightly different puzzle around how best to get to schools and the ideology. The big factor in this game was having tons of money. That was thanks to the massive Golden Ages of course, but also involved was Poland's UB, the Ducal Stable. This quietly adds 1 gold in addition to the usual 1 hammer on pastures. Doesn't sound like much, but that triggers the Golden Age gold bonus. That 2 gold times 20 pastures times 40 turns and counting of Golden Age, times a few market multipliers and the Commerce opener, added up to nearly 2000 extra gold.
With that much money, the right route is to buy the schools rather than build them. And remember, by the Great Scientist lockstep calculus, buying schools matters only if you buy all of them up through at least the last scientist-producing city. I still didn't have quite enough money to do that, especially without Mercantilism, ten schools would cost 7900 at undiscounted full price. So the best way to do all this was research Industrialization first for some discounts. (When you didn't enter the Renaissance by Acoustics, Industrialization becomes more attractive, since Sci Theory needs one more prerequisite in the missing Acoustics.)
Industrialization enables both Big Ben and Skyscrapers. Also a part of this puzzle is how fast you can get coal online to build factories for the ideology. Having it crop up pre-mined is ideal of course. Here it didn't, but there was one on a roaded tile so I could bring a worker onto it and start that same turn. That meant a delay of only 3 turns on factories (takes 4 turns to mine but you can use it on the 4th turn.) The best way to weave together all the pieces was this. While researching the three techs to Sci Theory:
- start Big Ben in powerhouse Lodz
- pause that and start factories in Lodz and Warsaw once coal was hooked
- after factory, finish Big Ben
- then buy the third factory with Ben's discount
- thus enabling the ideology and Skyscrapers to buy all the public schools with both discounts.
The picture above shows this just as the last pieces came together, one turn away from Sci Theory, two from Big Ben, and even a perfectly timed three turns away from the next policy to add Workers' Faculties right away. That's how it went here, but there's lots of other possible combinations around buying different quantities of factories (anywhere between 0 and 3), or skipping Big Ben, or rushing it with a faith-bought engineer, or sometimes simply going directly to Sci Theory and building the schools instead, and even that could go on to the ideology by way of either factories or Radio for the modern era.
Here, Industrialization first also had the extra benefit of Poland's industrial era free policy, which went into Free Thought on t142 followed by Sovereignty normally on turn 143. Industrialization first also enabled the second spy/diplomat sooner, which made sure I got the votes for Sciences Funding.
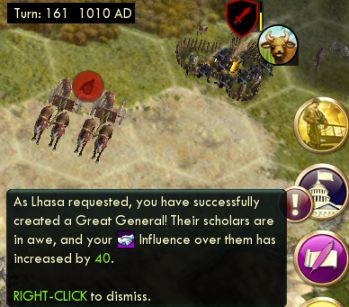 I don't think I ever got this before: a Great General entirely from fighting barbarians. I didn't even know it was possible; I knew fighting barbs does yield GG points (unlike in Civ 4) but thought there was a cap somewhere.
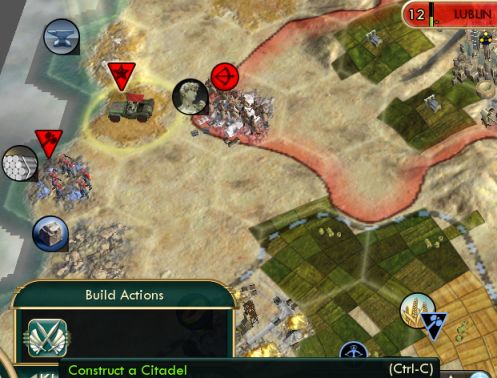 This proved significant, for a citadel to add that extra aluminum source there. Aluminum was still tight (I had 6 units before this and 9 after) and I had to juggle some hydro plants around the spaceship parts, but this noticeably loosened that squeeze.
Thanks to my newly-derived insight that bulbing before Plastics is equivalent to after, I spent all my available scientist bulbs (four) towards it. I didn't quite get the the theoretical optimum yield, since the bulbing actually had to start sooner than 8 turns after schools and Free Thought in order to duck the beaker overflow cap each turn.
- t157 bulb Radio, overflow to Metallurgy
- t158 research Rifling with more overflow
- t159 bulb Steam Power, overflow to Chemistry
- t160 research Fertilizer with more overflow
- t161 bulb Rep Parts, overflow to Military Science
- t162 bulb Plastics, overflow to Dynamite
Fertilizer is off the direct line to Plastics, but that was how I had to burn the overflow that turn, which was enough to one-turn that but not Rep Parts. Note that you never want to spend a turn putting research into a tech that you will bulb. The invested beakers come out the other end as overflow, and you don't want that for danger of running into the overflow cap.
So that got to Plastics on turn 162, my earliest yet by three turns (Babylon on t165.) I didn't quite have the money to instabuy all the labs (remember this is only 10 turns after buying schools), but got six right away (including, as always, the important ones in cities still slated to produce a Great Scientist) and the rest over the next few turns.
The endgame began on turn 170, eight turns after labs and just after my last naturally-produced scientist. An adjustment to my methodology hit me like a ton of bricks again here.
Here's why I overshoot the tech tree. The number of great scientists isn't a constant. Don't predetermine the number of cities to produce them. Just get as many as you will need then stop waiting for more.
In other words, if a game overshoots the tech tree, it's not because you didn't bulb early enough, it's because you waited too long for too many scientists. The real right answer to how many turns each Great Scientist saves is four. Because that's how long it takes to produce each one. With all the endgame scientists and GPP multipliers in place, cities still in GPP lockstep make 25-30 GPP/turn, so every four turns the next city will pass the next 100-increment threshold. The real right methodology is to count ahead for how many scientists you will get in total compared to the total cost of the tech tree. Once the total from cities and faith and wonders and policies is sufficient, stop producing them from cities and switch to endgame mode.
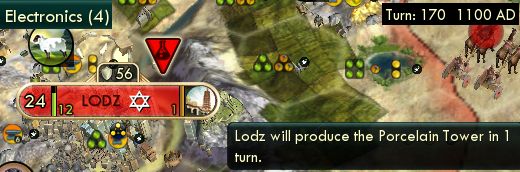
I had been treating the 900 GPP level as the point to aim for. But that's not right, that level is not a constant, it needs to be flexible. Here I'd have enough scientists to finish the tech tree after just the 700-point GSci plus all the other sources. So the right move was to switch to endgame mode right after that and cash in the Porcelain Tower now and all the other sources.
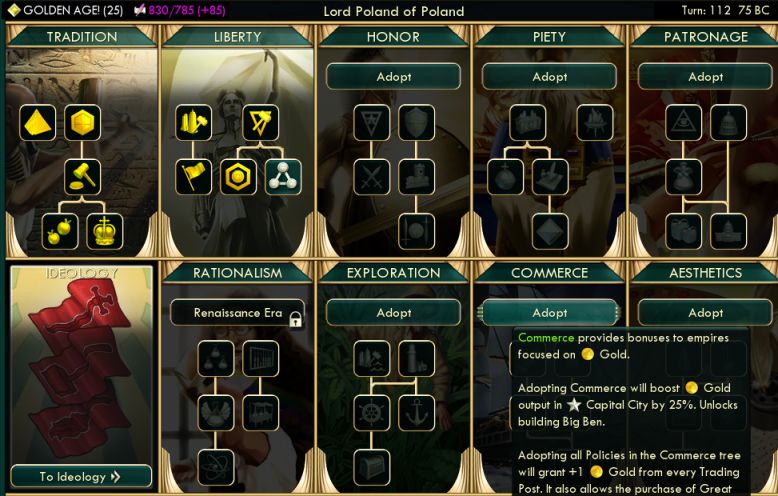
So on turn 170 here, I bulbed Electronics and overflowed to Ballistics the same turn. Then on turn 171 came the fireworks. All at once, I bulbed Radar and Rocketry and Satellites, each expensive enough not to run into overflow cap problems. All on that same turn I used Poland's atomic era freebie to complete Liberty and claim that Great Scientist and also the information era freebie to take Spaceflight Pioneers and that scientist as well. (Also Meritocracy gave more than enough happy that I sold all my colosseums.)
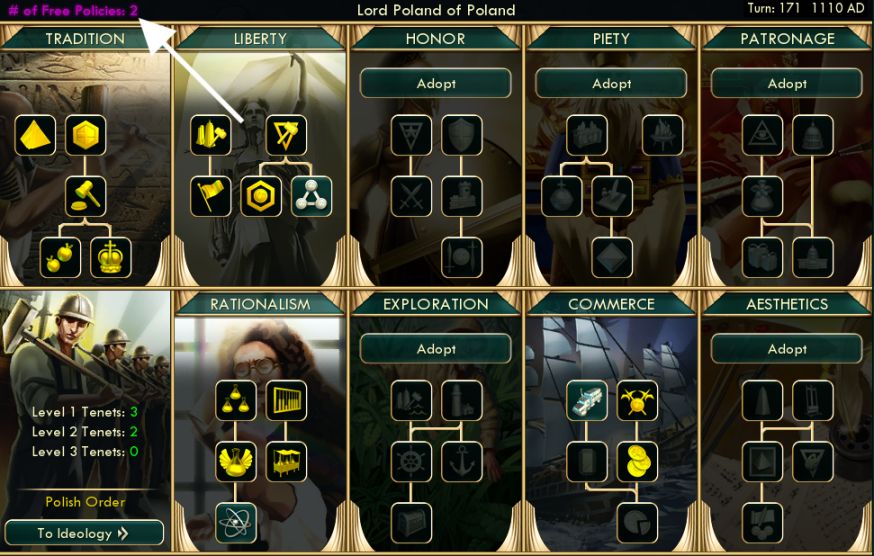
There's the policy tree with two of Poland's freebies stacked up on the same turn. I had also seen that we would finish both Order and Rationalism with room to spare, so could afford to dip back into Commerce to Mercantilism to have that for the labs and other endgame purchases. Wrapping up the later game on policies:
- T151 Order for Hero of the People and Skyscrapers
- T152 Workers' Faculties
- T157 Landsknechts via Poland's modern era freebie
- T161 Mercantilism
- T163 Socialist Realism via great writer
- T165 Five-Year Plan via two great writers
- T171 Meritocracy for the Liberty finisher via Poland's atomic era freebie
- T171 Spaceflight Pioneers via Poland's information era freebie
- T175 Wagon Trains
- T178 Scientific Revolution for the Rationalism finisher via Kremlin
Overall, compared to a regular game, Poland performed exactly as you should anticipate. They get 7 free policies throughout the game, which here went into completing Liberty plus Wagon Trains (just because there was nothing else useful to do with that one), in addition to the usual plan of Tradition, Commerce to Mercantilism, Rationalism, and Order to Spaceflight Pioneers. And of course Poland gets to a lot of intermediate milestones throughout Rationalism and Order sooner along the way.
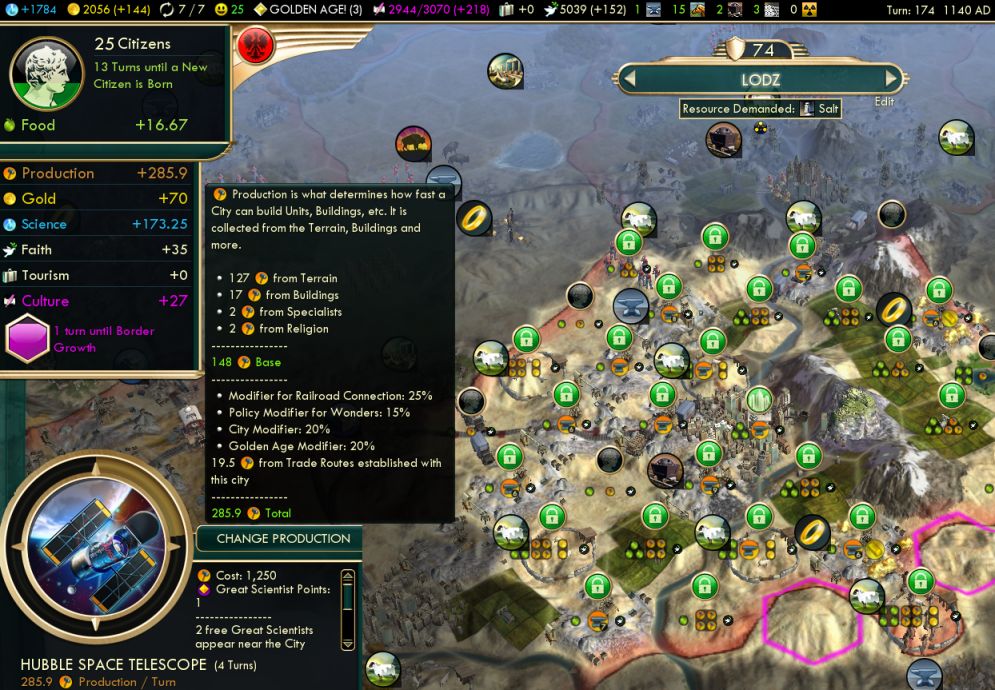
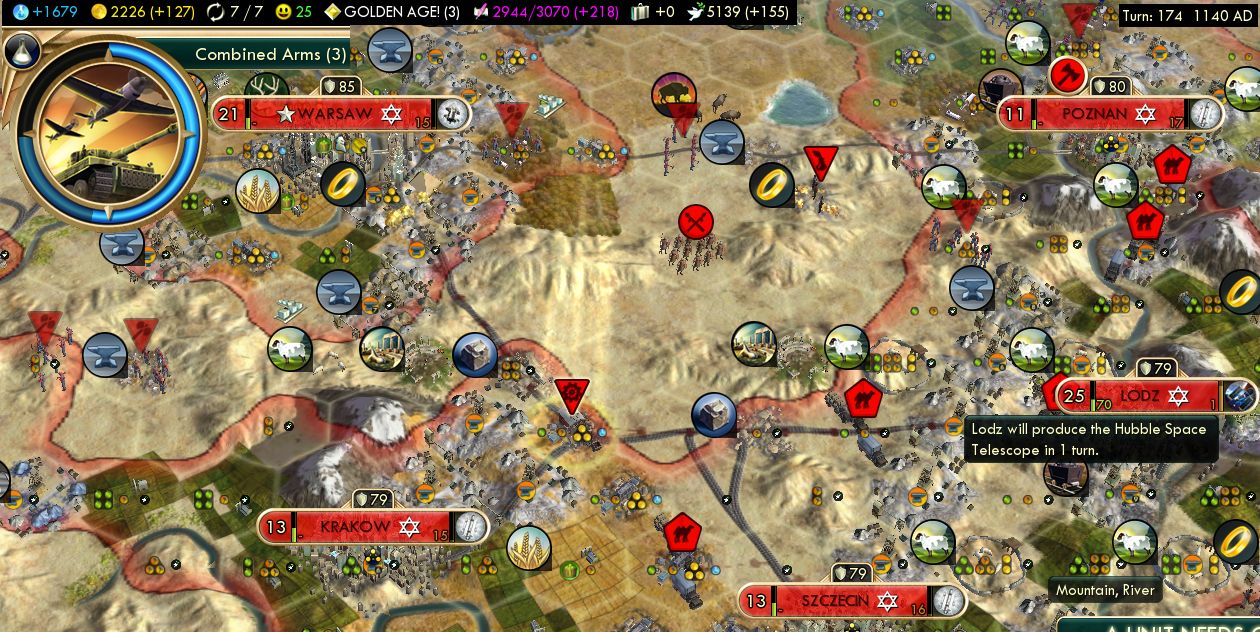
Turn 174 completed Apollo, bulbed Adv Ballistics, started 4 SS parts. Lodz the Petra-powerhouse will do all of the Hubblescope (engineer rushed), 5th part (normally), and 6th part (engineer rushed.) Yeah, no matter what, the limiting factor ends up being the SS parts. But I couldn't have gotten to Rocketry any earlier as I didn't have any other scientists yet to do it! The listed turn numbers there would drop after power plants and SS factories, although they came later than usual due to lack of aluminum until we could also reach recycling centers.
I couldn't bulb sooner because I didn't have the faith-bought scientists yet, which requires the Rationalism finisher, but you don't want to use that until a last-column tech is available. So the order had to be to build Hubble, then use those scientists to bulb Computers and Lasers, then complete Kremlin at the right time (t177) for the Rationalism finisher for Nanotechnology. Before that I had to spend three turns to research Combined Arms manually, or else would have lost some overflow to the cap. After Nanotechnology, the top-line techs always come last, but there ensued another small delay in manually researching Biology and Refrigeration to get to techs expensive enough not to waste overflow. These speed bumps didn't directly affect the date to finish researching, but did delay spaceship factories by way of delaying recycling centers for more aluminum.

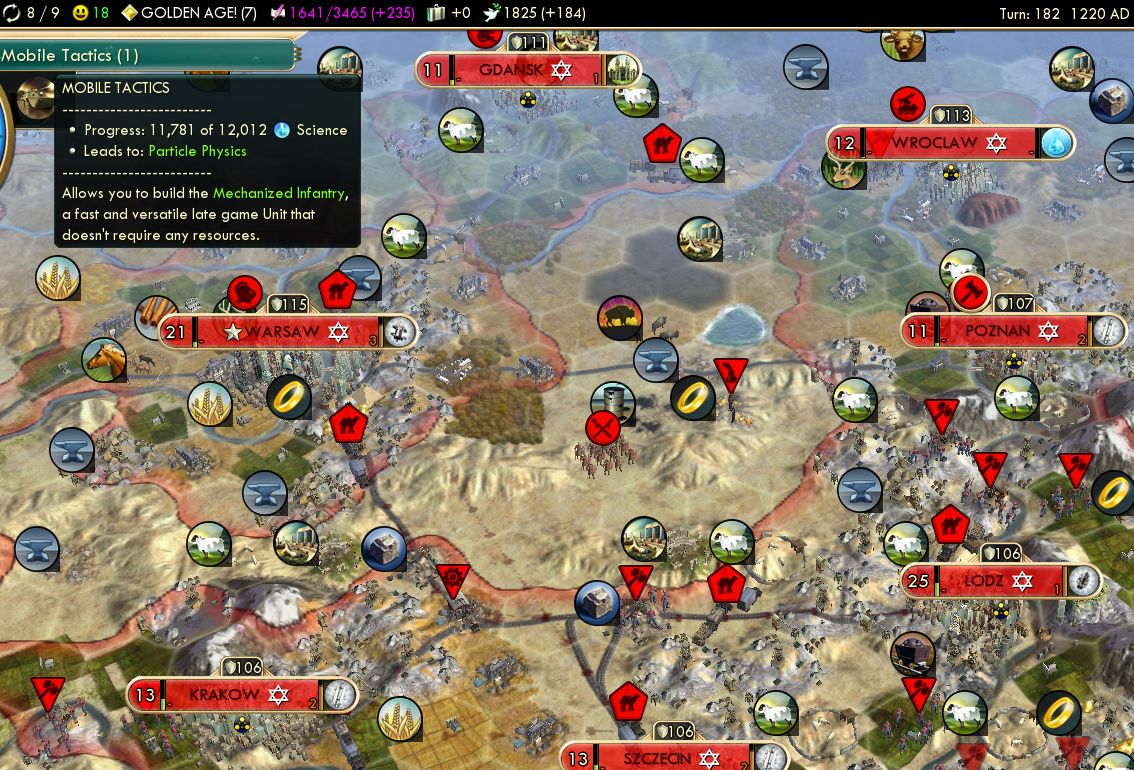
Turn 180 were finally the final bulbs to Ecology, Telecommunications, and Mobile Tactics. 12345 beakers, hey that's the combination to my luggage!
Ultimately I completed both the tech tree and all the parts perfectly in sync. (Gdansk is building Oxford for Particle Physics, then Lodz would 1-turn the last part with an engineer.) Although I fell just 200 beakers short of saving a turn, a number that could have been fixed. I overlooked that I'd have a second engineer coming from faith, so could have used that for the part currently in Warsaw while building research instead. I did buy that engineer now to save a turn in Warsaw anyway. Reliquary could have saved a turn after all, even though I didn't assemble the pieces correctly.
I also lost a turn because Lodz is too far from Warsaw for the last part to reach it by railroad. Nothing to do about that, though.

So we won on turn 185. Exactly the same as Babylon. Although of course this was a better performance if it came to the same result without El Dorado and was really two turns better if not for those endgame snags. Looks like the Poland plan for both Liberty and Tradition works out pretty well indeed. The late Liberty finisher for an extra Great Scientist makes the difference there, that saves four turns as compared to waiting for one more city-spawned scientist.
Oh, and there's a new record for latest ruin. I parked my scout there just to watch if it could last all the way until the end of the game. Too bad that Iroquois sword had to turn up one turn too soon before we could launch it with us into space.