This is my writeup of a solo playthrough of the board game Terraforming Mars. I played this using the open-source implementation from here, although the functionality would be the same using the physical board game.
This writeup is meant for an audience familiar with the game. I won't cover the rules for the mechanics; particularly the Turmoil expansion might be confusing if you're not familiar with it, but you can find resources on that elsewhere. I'll give a brief description of the solo gameplay: you get a fixed number of generations (game rounds) to complete all the terraforming parameters in order to win, and then your goal is to maximize your score. A score of 120 is considered pretty good in the base game, but with expansions you can go much higher, and that's what I'm aiming to demonstrate.
Setup
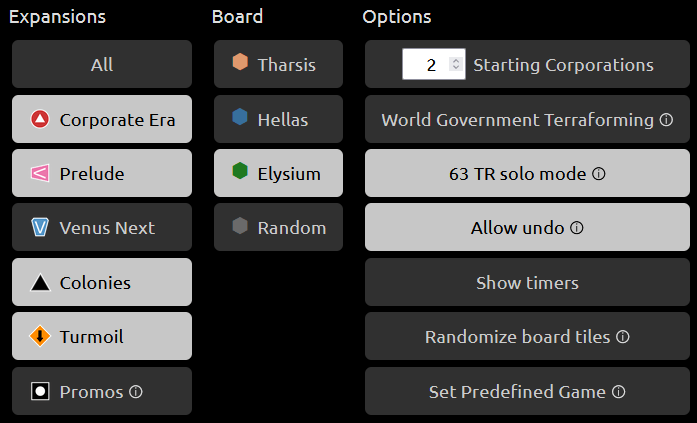
The first big concern is what configuration to use, meaning what expansions. For this, I'm including Prelude, Colonies, Turmoil, and the Elysium map, but excluding Venus Next and the promo cards. Colonies and Turmoil pretty obviously increase your productivity and scoring potential. Prelude is actually less clear, the difference being that you get 14 generations without Prelude or 12 with, and it's quite possible that two extra generations might be worth more than the prelude cards; but I did go with including Prelude this time. On the down side, Venus Next and the promos dilute the deck, reducing the density of good stuff like discounts and card drawing, and therefore your expected scoring potential. They do raise the maximum ceiling if you have great luck, but you have to draw through a lot of extra crap cards to get there, and so I left them out for this.
I think Elysium is the best of the three maps for scoring, although I haven't proven it out analytically. It has the largest contiguous area to build a maximal grid of cities and greeneries uninterrupted by oceans, compared to Tharsis being divided into two hemispheres and Hellas leaving an awkwardly unusable strip of land east of the ocean basin. The key point on Elysium is that you can build your grid right on through the small two-tile ocean area, with the two greenery-on-ocean cards! Finally, of course Elysium has the Olympus Mons space, where one tile placement will draw you three free cards.
The other big concern is how much to "cook" the starting setup. It's very tempting (and this program implementation allows it) to exclude a number of corporations and preludes and colonies and Turmoil events, such that you know you'll be limited to getting only good ones. The justification would be that if you got a bad deal, you could just abandon it and reshuffle and restart, so why not save time by cutting that out to skip directly to the good stuff. And indeed, I tried a number of setups and playthroughs doing that. The problem is, as always, that there's no endpoint to the slippery slope. If you start to manipulate the randomness at all, there's nothing to stop you from going all the way, until you've fully picked every detail of your starting hand and stacked the order of the entire deck, until you're playing a completely preselected and deterministic game. This can be an interesting exercise in itself, but I'm trying to give the feel of a real game, not that.
Ultimately I decided the only amount of permissible cooking had to be none at all. I would only manually start games until seeing a randomized setup that was good enough to play. And you don't have to believe me, but it actually happened that the game I played here turned up on the very first deal after I settled on this configuration and parameters. I intended to aim for about a top 1% percentile result, just on the outer edge of what you might see in a lot of manual playing, and within range of actual perfection such that you could see the extrapolation to get there. I think I got that in this play, as we'll see.
Start
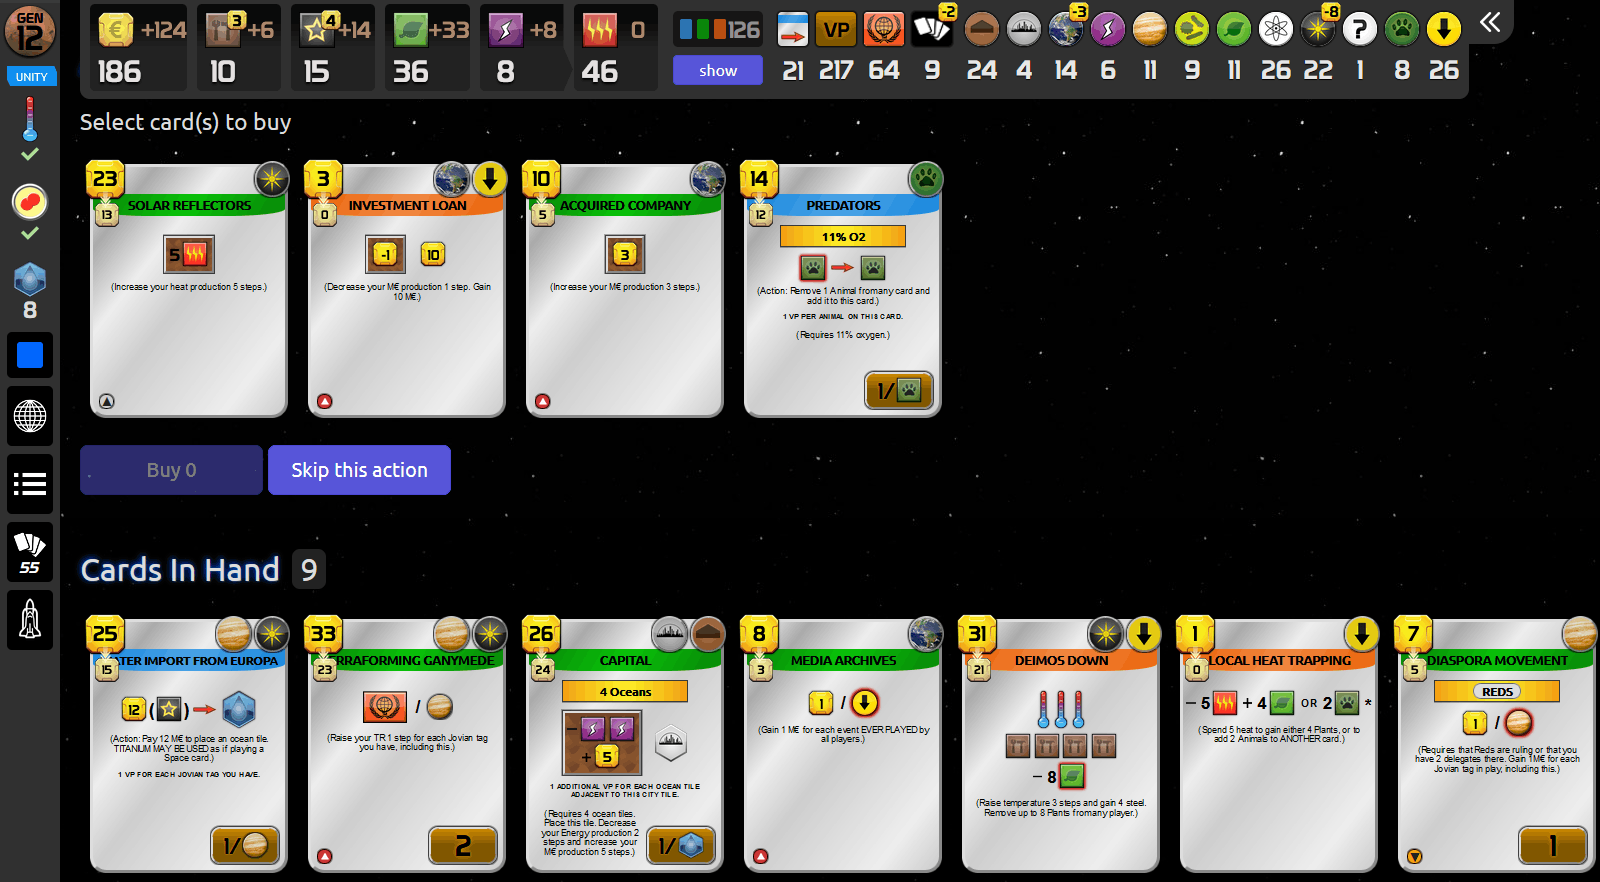
So here is the starting hand we've got. (Apologies for the big images, but get off your phone and read this on a real computer. The card text isn't legible if I reduce them at all.)
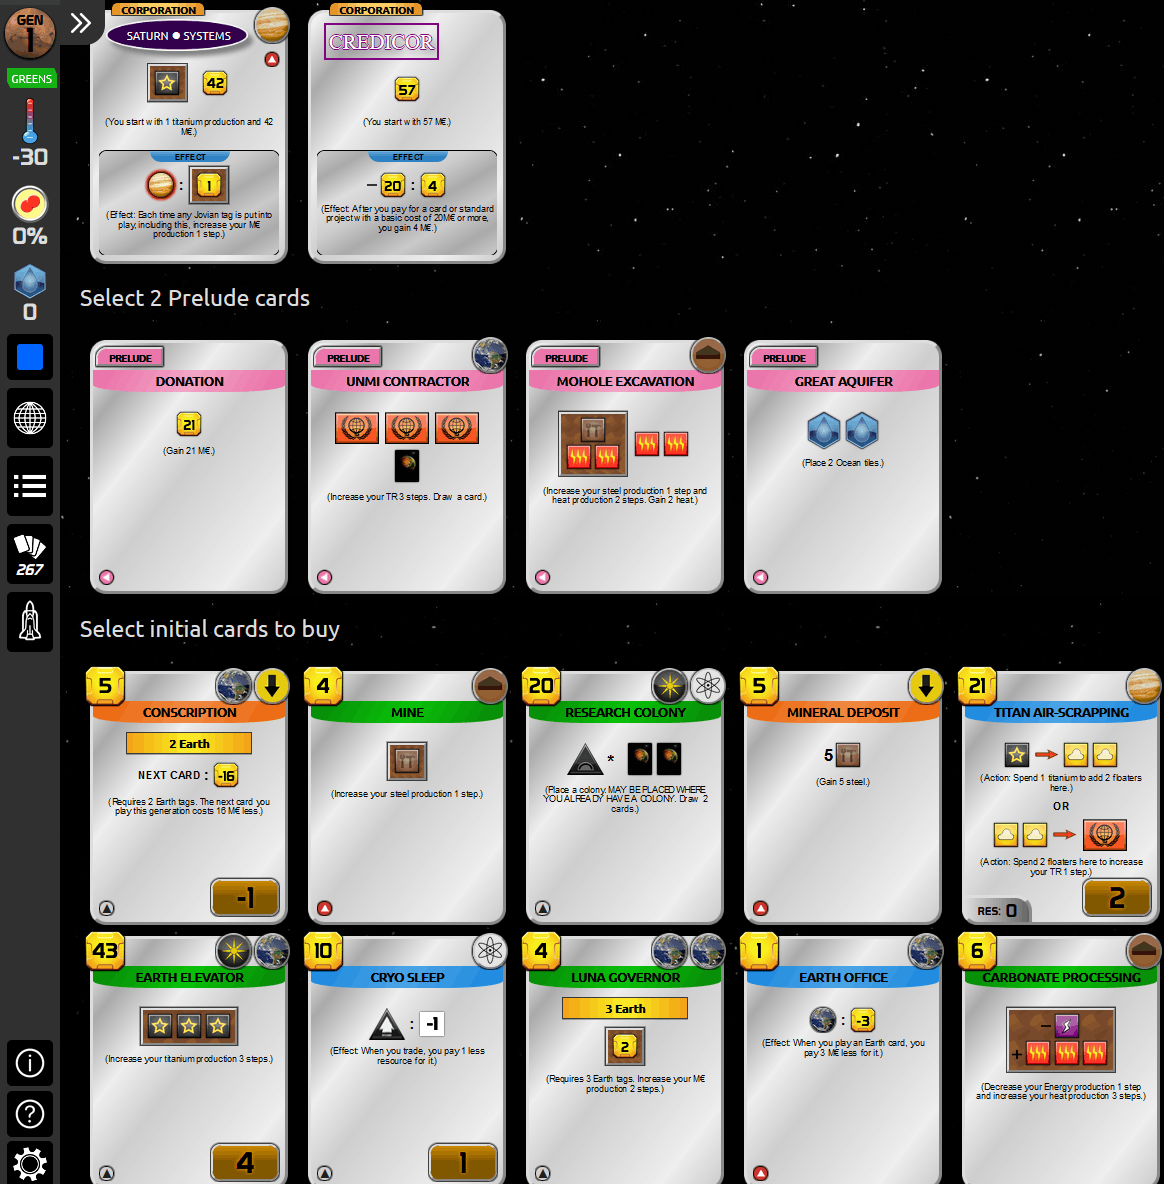
Lots of good stuff here. First, we have a top-three corporation in Credicor (the other two being Point Luna and Manutech), with high starting wealth and a productive rebate trigger. Saturn can also be solid, if you have some cheap Jovian tags ideally including preludes, but we don't have that here, so Credicor is a clear pick.
The next big piece is Earth Elevator. That's the single biggest production card in the game, and we've got the means to play it on generation one here! It's not quite the #1 best card to see in your opening hand (that's Earth Catapult), but it's probably in the top ten, and I'm happy enough with it here. Earth Office is also a top-tier starting card.
Next, consider the preludes. Mohole Excavation and Great Aquifer are out; I've found in these solo plays that preludes that do heat or other terraforming are unnecessary; if you get a good enough draw engine going, you get plenty of better ways of terraforming throughout the project deck. That leaves Donation, which is fine if you have production cards to spend the money on, which we do. And the second prelude is UNMI Contractor, which is weak-ish, but 3 income from the TR isn't terrible, and what really matters here is that all-important Earth tag.
Everything here assembles perfectly: Earth Office into Conscription into Earth Elevator into Luna Governor! Earth Office discounts all of them, is the second Earth tag to enable Conscription, to apply its huge discount to Earth Elevator, which triggers Credicor's rebate and in turn provides the third Earth tag to enable Luna Governor, which gets discounted twice by Earth Office to completely free!
So I'm keeping 8 cards in this starting hand. Not Carbonate Processing; heat production is unnecessary as I mentioned with the preludes. And not Titan Air-Scrapping, because the 3 credits to keep it would prevent another important play that I'll get to shortly. Leaving this behind is a little disappointing; every Jovian tag is 4 extra points if we find all the cards that score for them; but this card is very slow and only scores points but does nothing for productivity.
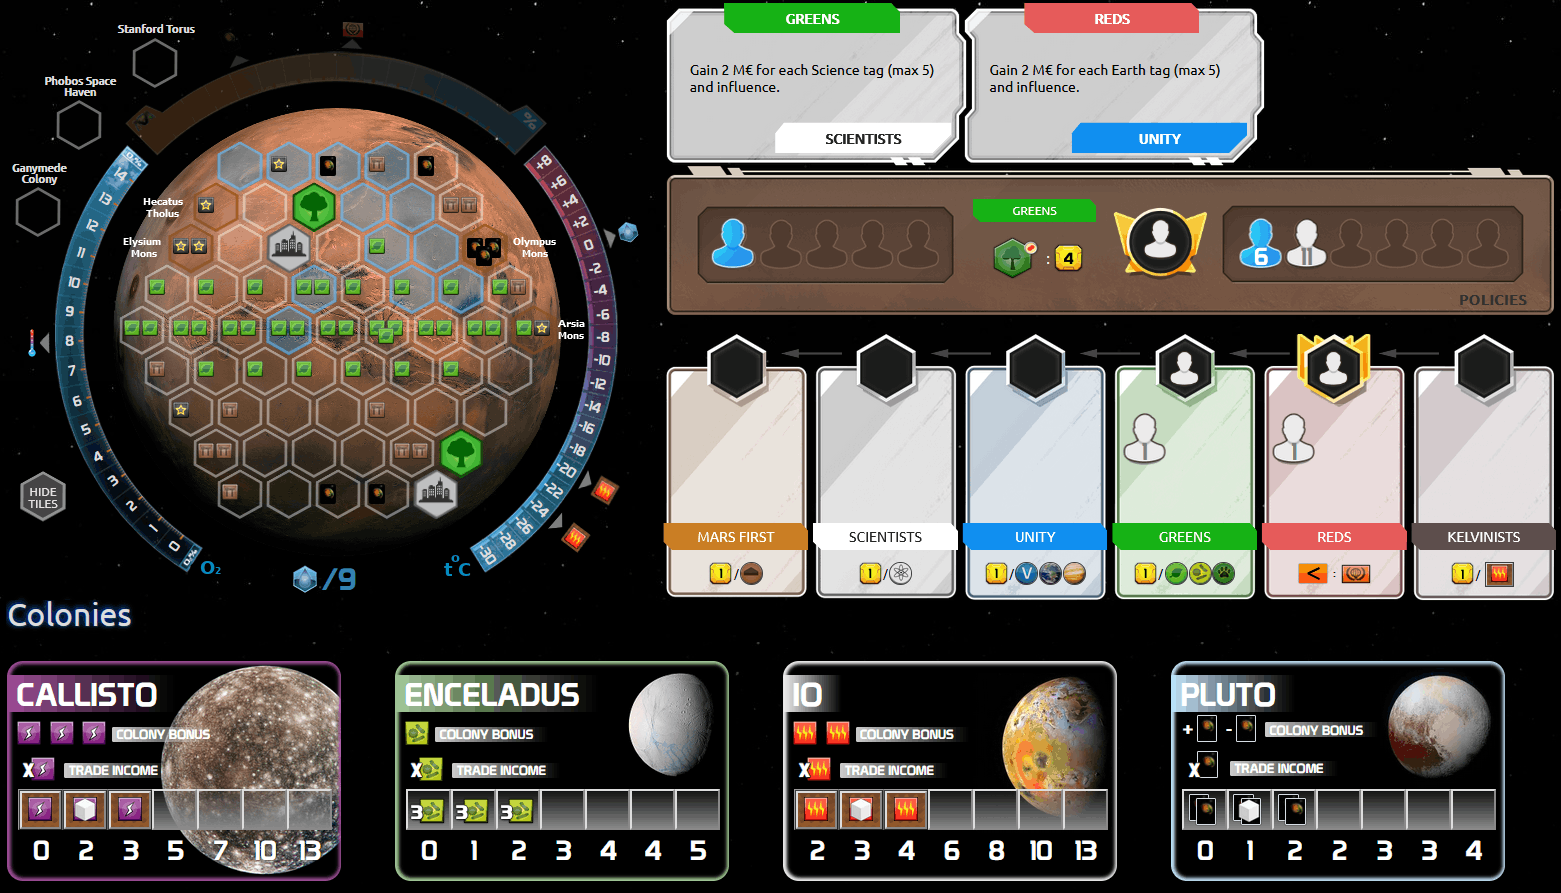
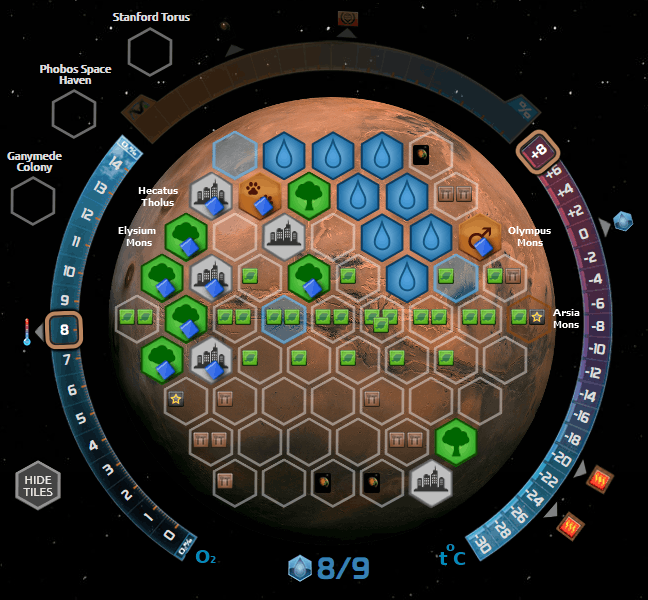
Here is the rest of the starting setup: the map, Turmoil board, and colonies.
The map is set up decently well, good enough to play. That neutral city in the northwest is in my way a little bit, but that's going to have to be tolerable. Everything else is great: the second city is nicely out of the way, and where I can still score a point off its greenery, and Olympus Mons remains open.
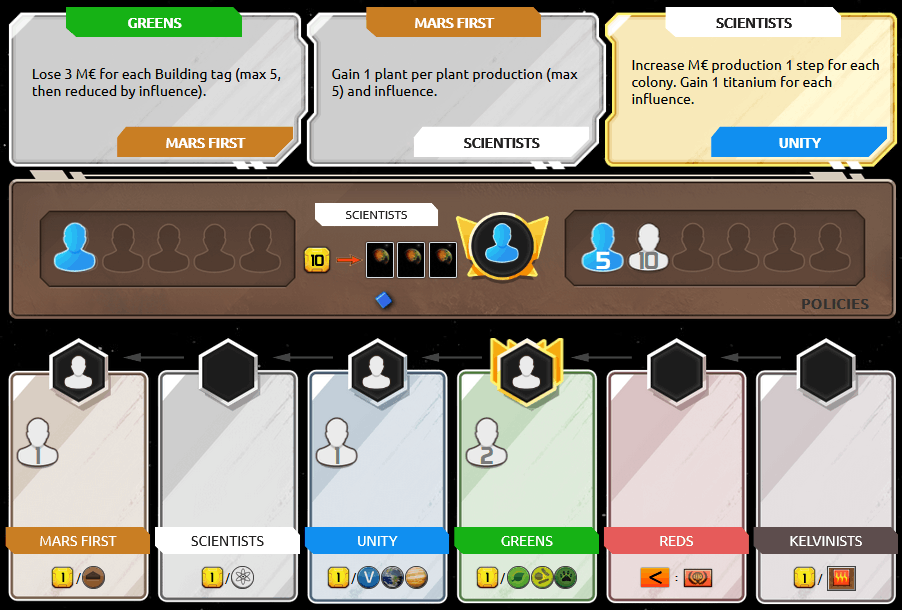
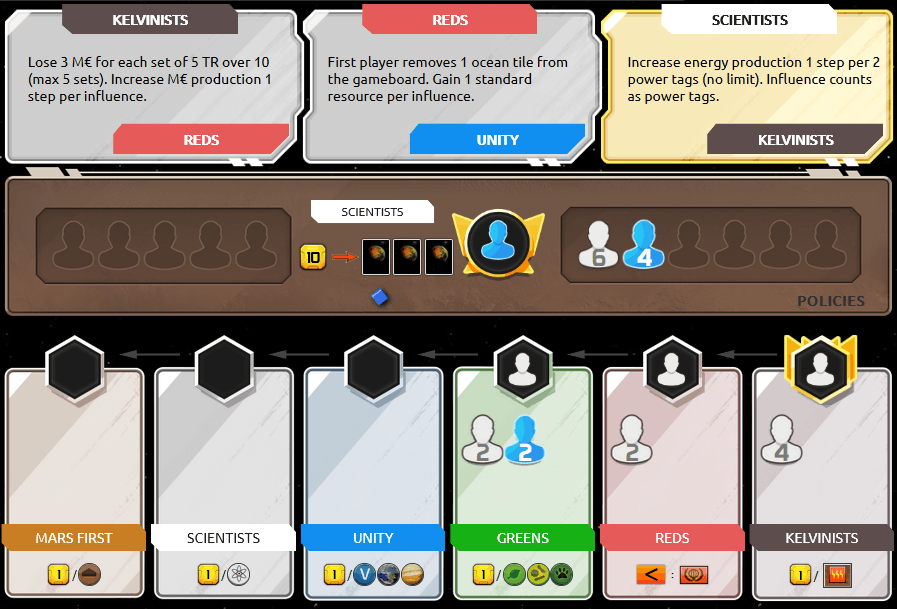
The Turmoil delegates don't matter much at startup, but the upcoming events do. And look what a nice one is there for round two, a payout per Earth tag! The round-three event is also positive, and that's about as good as you can expect.
Finally, the colonies: we've got the all-important one in Pluto and so this start is a keeper. The rule for solo is that you draw four colonies and discard one of them. Io and Callisto aren't great, but workable enough to keep. It's an easy call to toss Enceladus; I don't have any microbe cards to start, and microbes never really help engine building, just score a small and negligible amount of points.
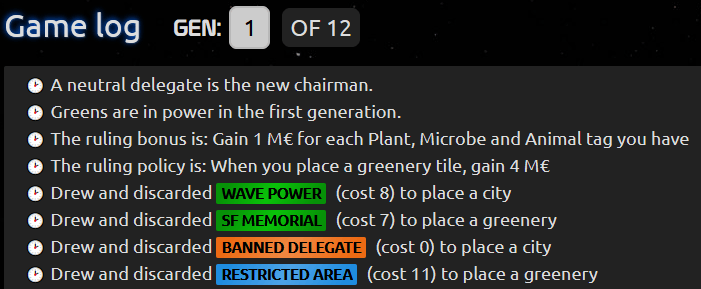
There's one more thing to check on startup: what cards got discarded to place the neutral cities and greeneries. (This program implementation gets this slightly wrong; you're supposed to see these before picking your starting hand, but this log window isn't visible until after that.) You don't want to lose a Jovian-tag multiplier or one of the big discount or drawing engines. These discards are fine; the first three are completely expendable; losing Restricted Area is slightly regrettable but we can live without it.
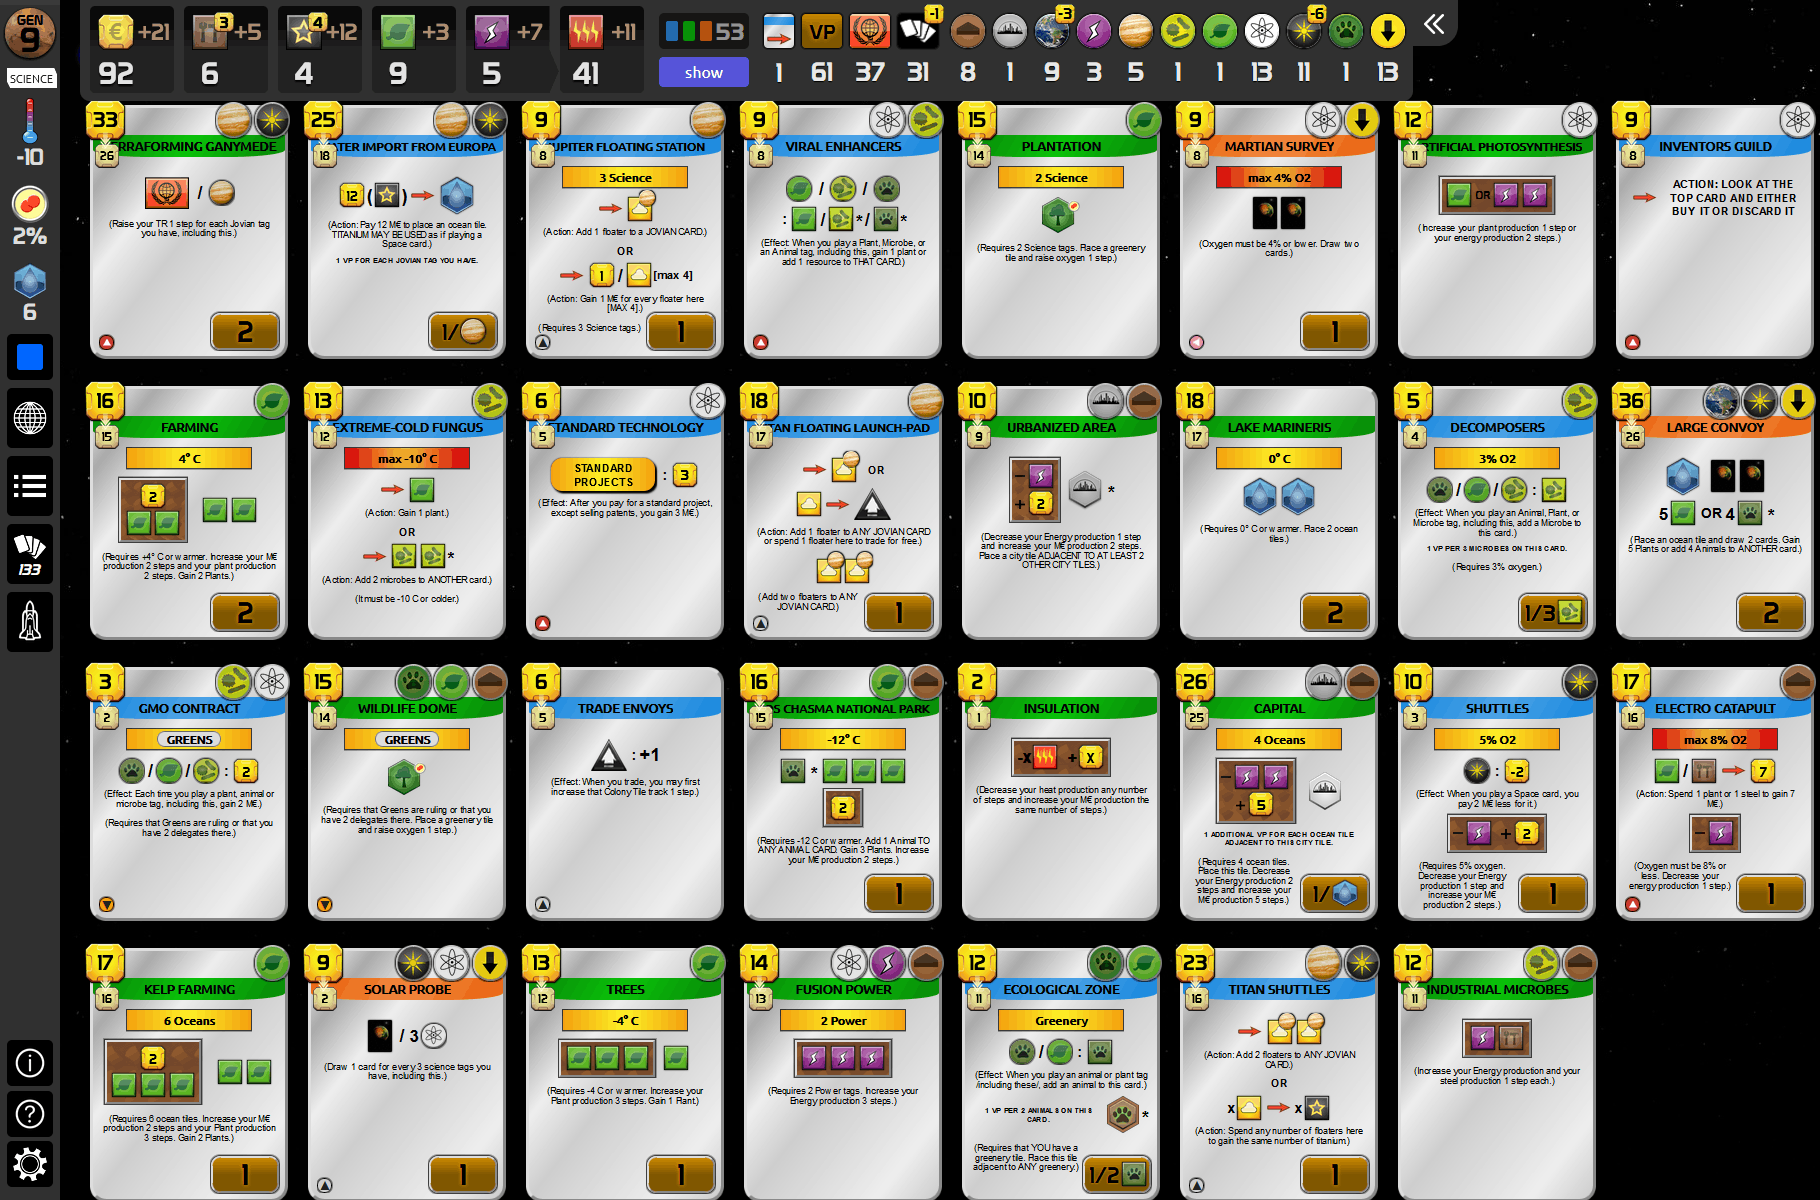
Generation 1
I had my plays for this generation planned out from the starting hand. However, there's one more important piece, and I made sure to save enough money for this (and why I couldn't keep Titan Air-Scrapping): a standard project colony on Pluto. Standard projects are always slightly overpaying, but I really want to do that here, so that I can then double-up on Pluto with Research Colony next round. And it was correct to do this first, in case the colony drew anything important.
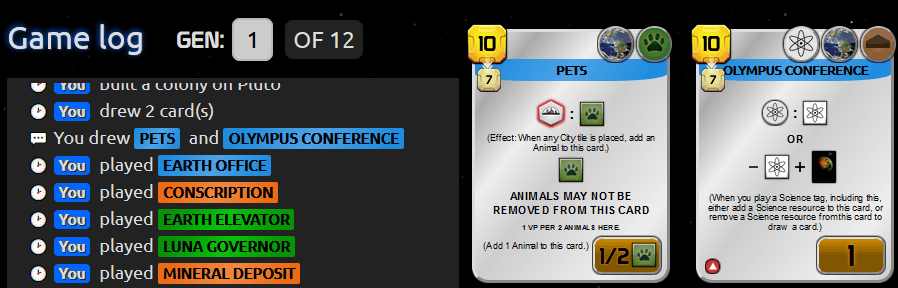
I got Pets, useful scoring for later... and the mighty Olympus Conference, one of the major draw engine pieces! Doesn't change what I'm doing in round one, but will soon. To officially chronicle my plays in gen 1:
- Donation prelude
- UNMI Contractor prelude
- Draw Adapted Lichen, not all that useful (inefficiently costed) but might play it sometime
- Standard project colony on Pluto
- Draw Pets and Olympus Conference
- Earth Office
- Conscription
- Earth Elevator
- Trigger Credicor rebate
- Luna Governor
- Mineral Deposit
- Mine (pay with steel)
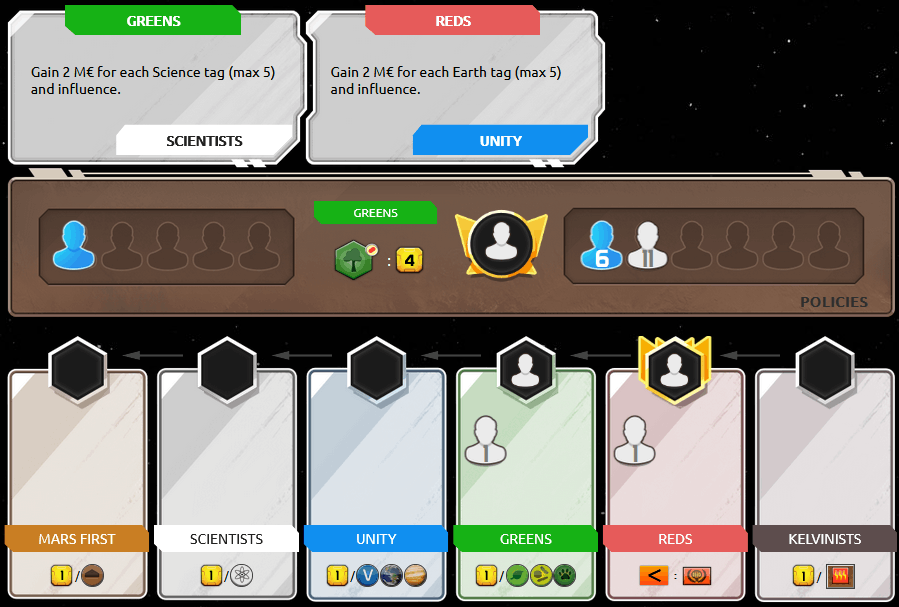
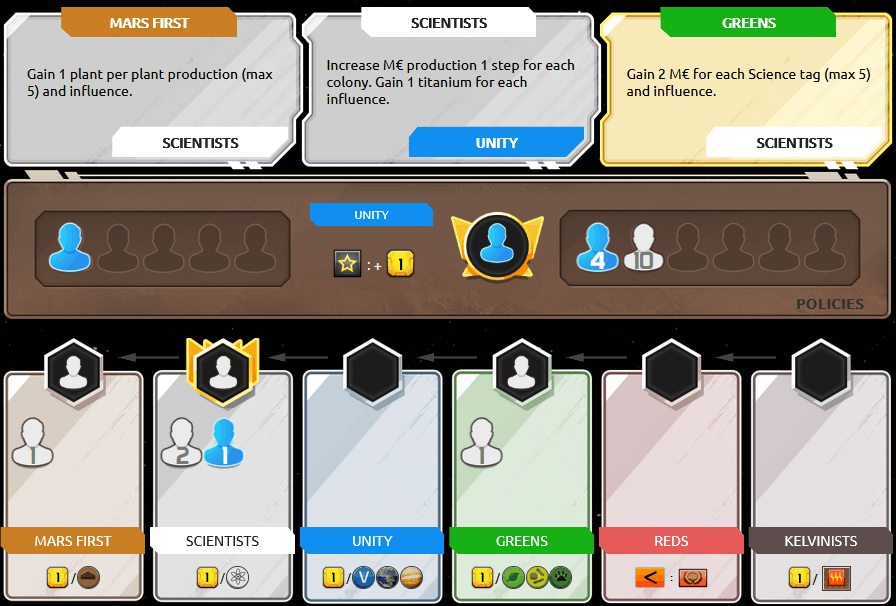
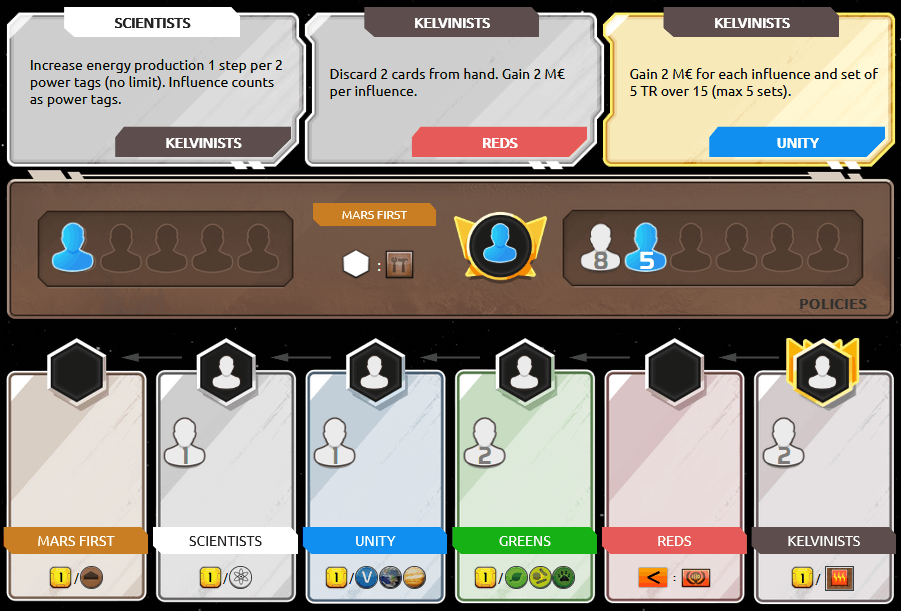
The last thing to consider in the first round is what to do with the Turmoil election. There's one more tiny bit of luck visible here, in that the Reds became the dominant party by having that first neutral delegate. The Reds are probably the best party to win this first election; you're not going to have the tags or resources to do much with any of the other parties, but the Reds policy bonus is a free TR (in solo, if you're at or under 20 TR), and the Reds policy penalty doesn't hurt anything if you don't do any terraforming which I'm not going to.
The right move here is to let the Reds win and put my free lobby delegate in Unity for next round. Notice that the next incoming neutral delegate will be Unity (the bottom half of the event card in the middle slot.) By doing this, I take the party leadership ahead of that neutral delegate. I call this move to myself "pacing", getting there first to hold the leadership in what would be a tie situation. I'll hold that leadership as long as the other incoming delegate next round isn't also Unity, a 5/6 chance.
Generation 2
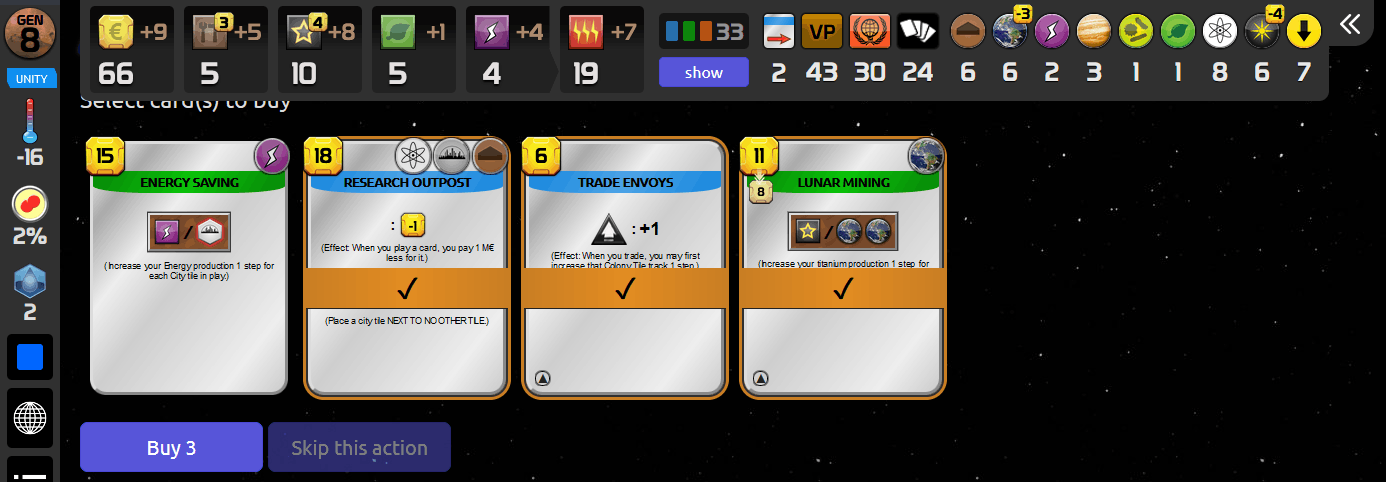
I didn't take a screenshot and forgot what they were, but all four dealt cards were nothing usable, so I discarded them and we'll continue with the rest of the plan. Get Pluto double-colonied and start trading with it, helpfully discounted by Cryo-Sleep.
- Olympus Conference (pay the last 3 steel + 1 credit)
- Research Colony (pay exactly 17 credits + 1 titanium, to save 2 titanium for trading with Pluto)
- Trigger Credicor rebate
- Draw Methane from Titan, Hackers
- Olympus Conference trigger draws Psychrophiles
- Place colony on Pluto
- Draw Water Splitting Plant, Mars University
- Cryo-Sleep
- Trade with Pluto (pay 2 titanium)
- Draw Magnetic Field Dome, Mass Converter
- Colony bonus: draw Natural Preserve, discard Hackers
- Colony bonus: draw Energy Tapping, discard Water Splitting Plant
- Psychrophiles (and use its action)
I formatted the sequence of plays like that so you can see what's going on with all the triggers and sub-triggers, particularly for Research Colony and the trade on Pluto. From here on I'll simplify and consolidate some of that sometimes.
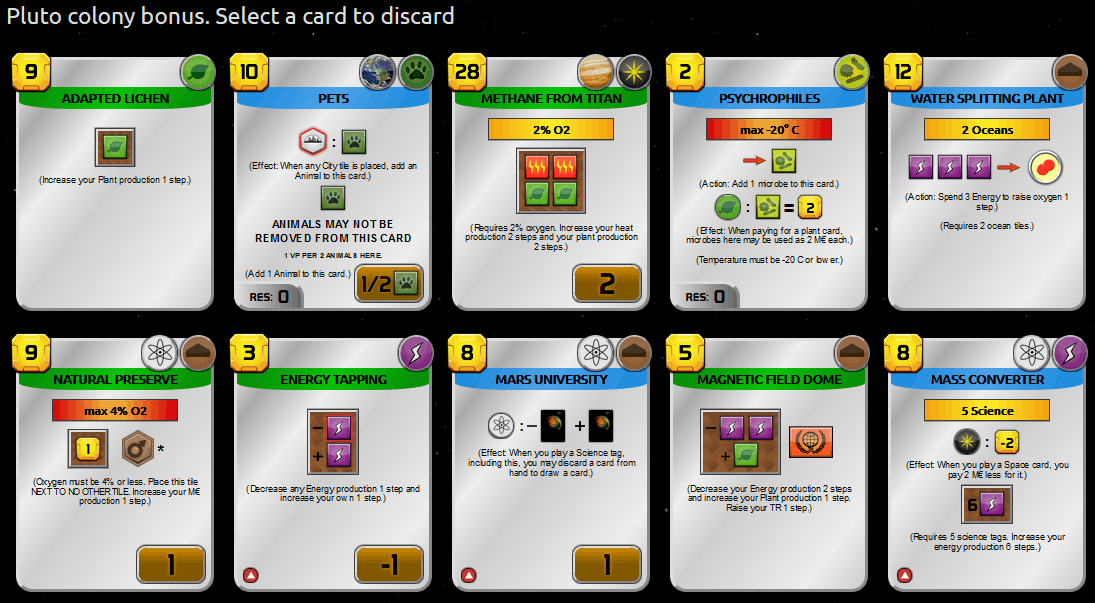
That was a total of nine card draws, from Research Colony itself (2), the second Olympus trigger, the new colony on Pluto (2), the trade with Pluto (2), and the colony bonuses on Pluto (2). Look what that resulted in: Mars University, the other half of the science draw engine! Plus Mass Converter, which is a nice score since I'll have the science requirement soon, and then I don't need to spend any other resources on power. And even Natural Preserve is a great play here too, for another science tag and trigger, and the tile placement on Olympus Mons for three more cards.
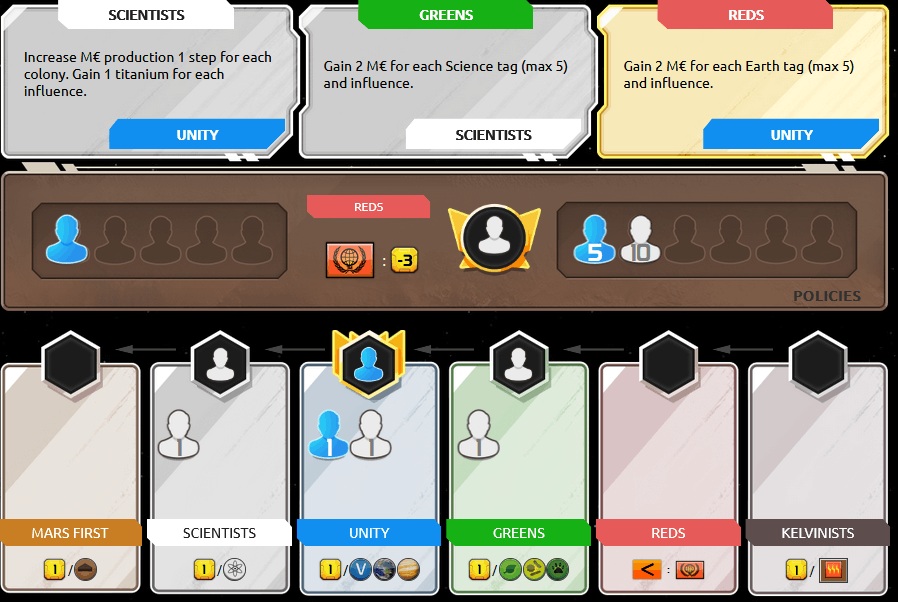
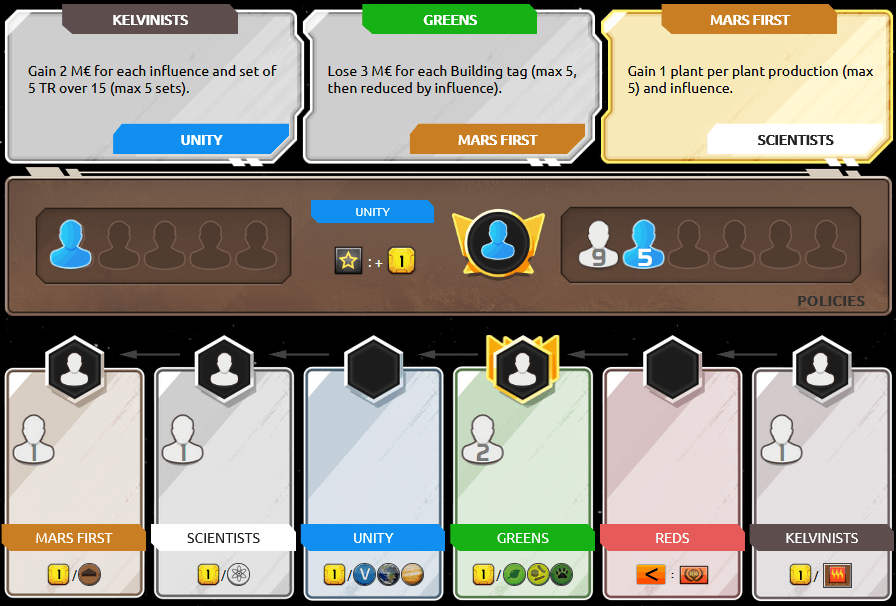
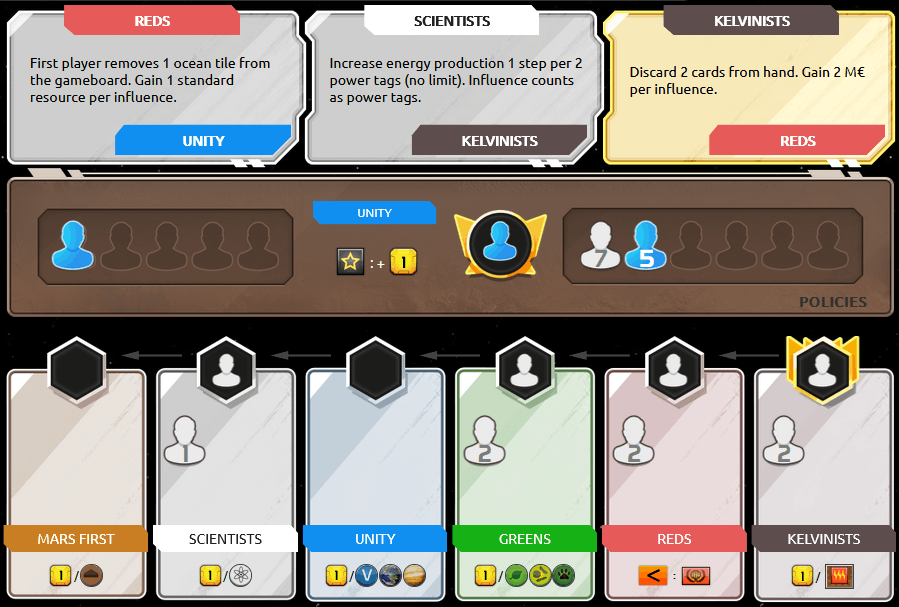
And again, the last thing to do in the generation is handle the Turmoil election. I'm very happy to let Unity win as currently shown, for the party payout of 6 credits for my 6 Earth tags, and the titanium boost next round, and it only took one delegate from me. Also note the current event, which will pay an extra 12 credits for Earth tags (max 5) plus my one influence for having the currently dominant party leader. All that money is like getting ahead by an extra half-generation or so on development. I now lobbied my free delegate into Scientists, and we'll talk more about that next round.
Generation 3
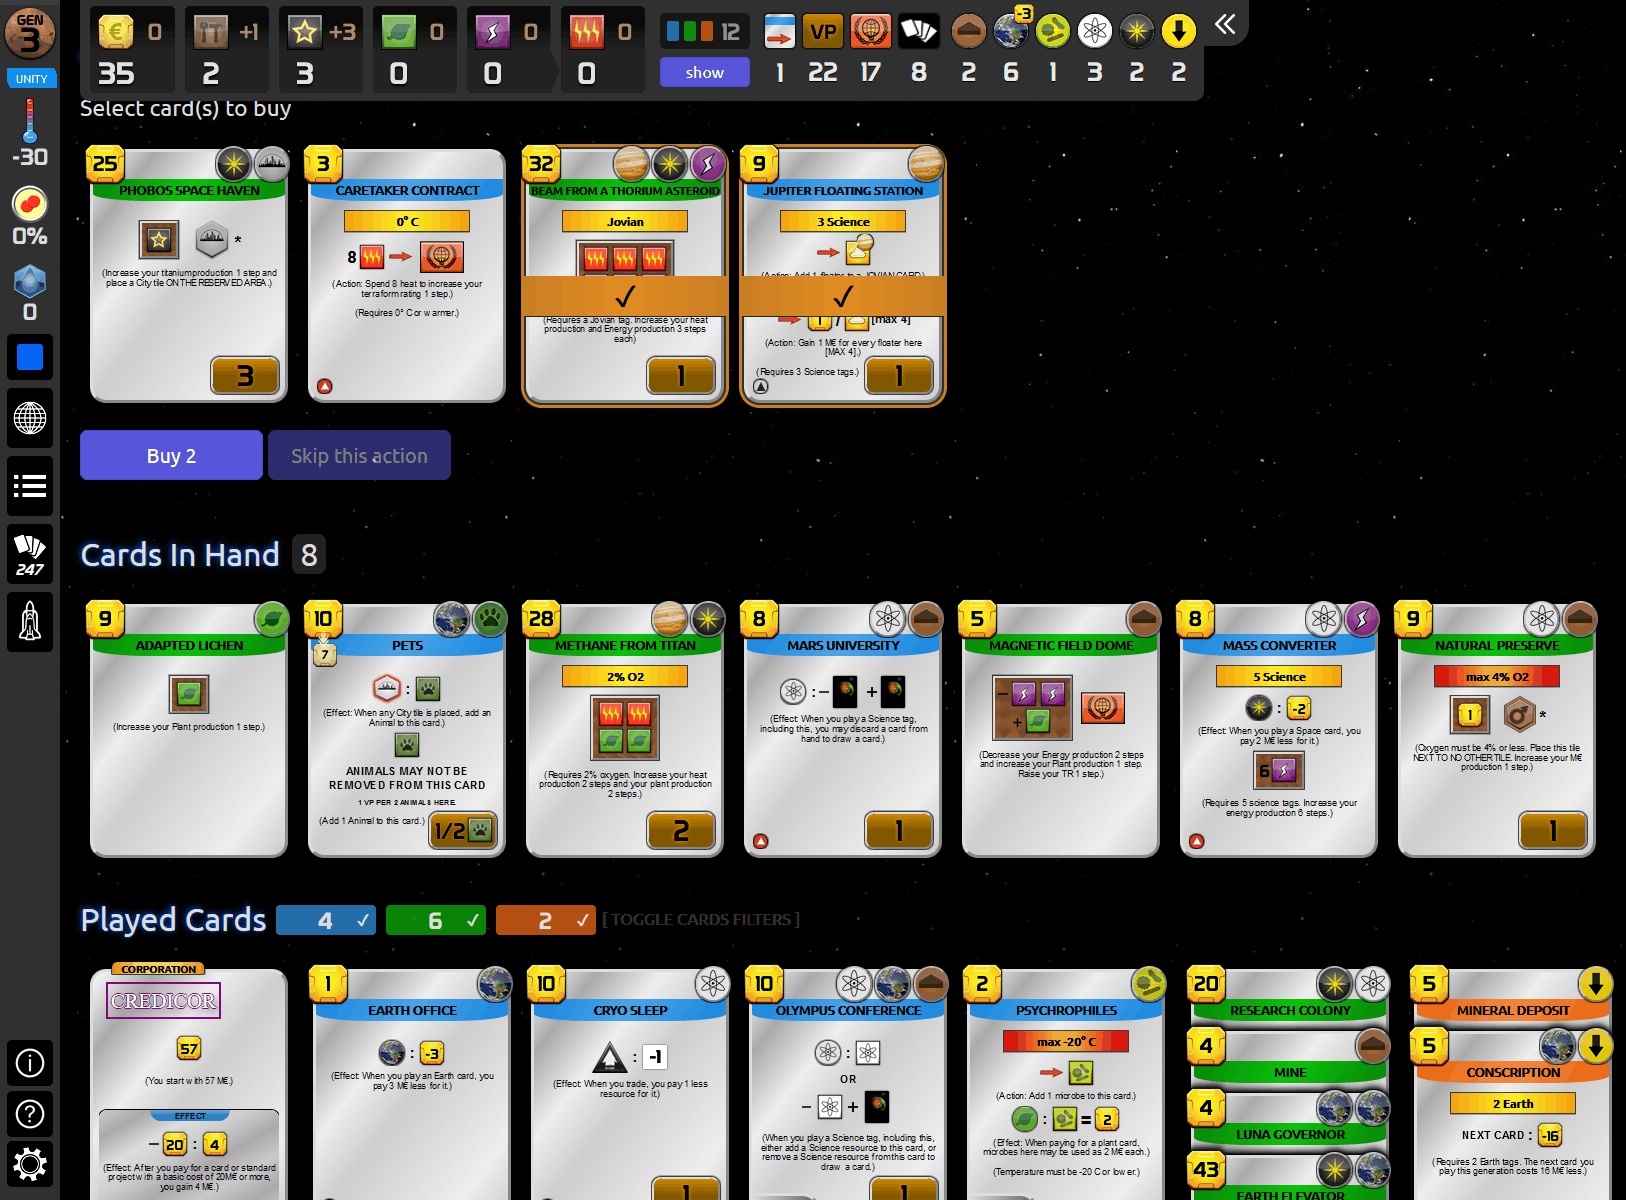
Here's things at the start of generation 3. I'm keeping the two Jovian cards; both are slow, but now I can afford to let them wait in hand for the Jovian point scoring at the end of the game. What I decided against was Phobos Space Haven; it's OK but I'm not going to play it soon and I've got more important things to do.
Since nothing new came up, continue with my planned plays, with the science tag draw engine now rolling:
- Mars University
- Olympus Conference trigger draws Viral Enhancers
- Mars U trigger discard Magnetic Field Dome, draw Trading Colony
- Natural Preserve
- Place tile on Olympus Mons: draw Grass, Plantation, Asteroid
- Mars U discard Grass, draw Parliament Hall
- Mass Converter
- Olympus draws Martian Survey
- Mars U discard Parliament Hall, draw Rad-Chem Factory
- Asteroid (pay 3 titanium, get 2 back)
- Trade Pluto (spend 2 titanium)
- Draw Artificial Photosynthesis, Public Celebrations, Giant Ice Asteroid, Sponsored Mohole
- Discard Public Celebrations, Energy Tapping
No major engine components in those draws, although Viral Enhancers is another good repeatable trigger. Giant Ice Asteroid of course is worth playing when we can, though it can wait until we have spare titanium.
Time for the Turmoil election again. This situation is worthy of a power move: use my free delegate plus pay for another one to swing the Scientists party leadership 3 to 2. I call this move a "crush" to myself, buying your way in over some number of opposing delegates. Needing to commit 3 delegates to win the election looks inefficient, but it's not -- winning 3:2 is actually erasing opposing delegates at a more efficient ratio than if you spend 2 to overcome only 1.
Here's why this is worth it. Doing this earns all of the following: a second influence this round, the chairmanship for 1 TR, and one influence the following round (for being chairman). The influence is worth 2 credits this round and a titanium next round, which is likely to be worth 4 when spent with Unity. The effective cost for the delegates is 10 (I paid 5, but there's an opportunity cost of using the free delegate for this), so the overall net is that I paid 4 credits for a TR, which is efficient enough to be worth it.
Generation 4
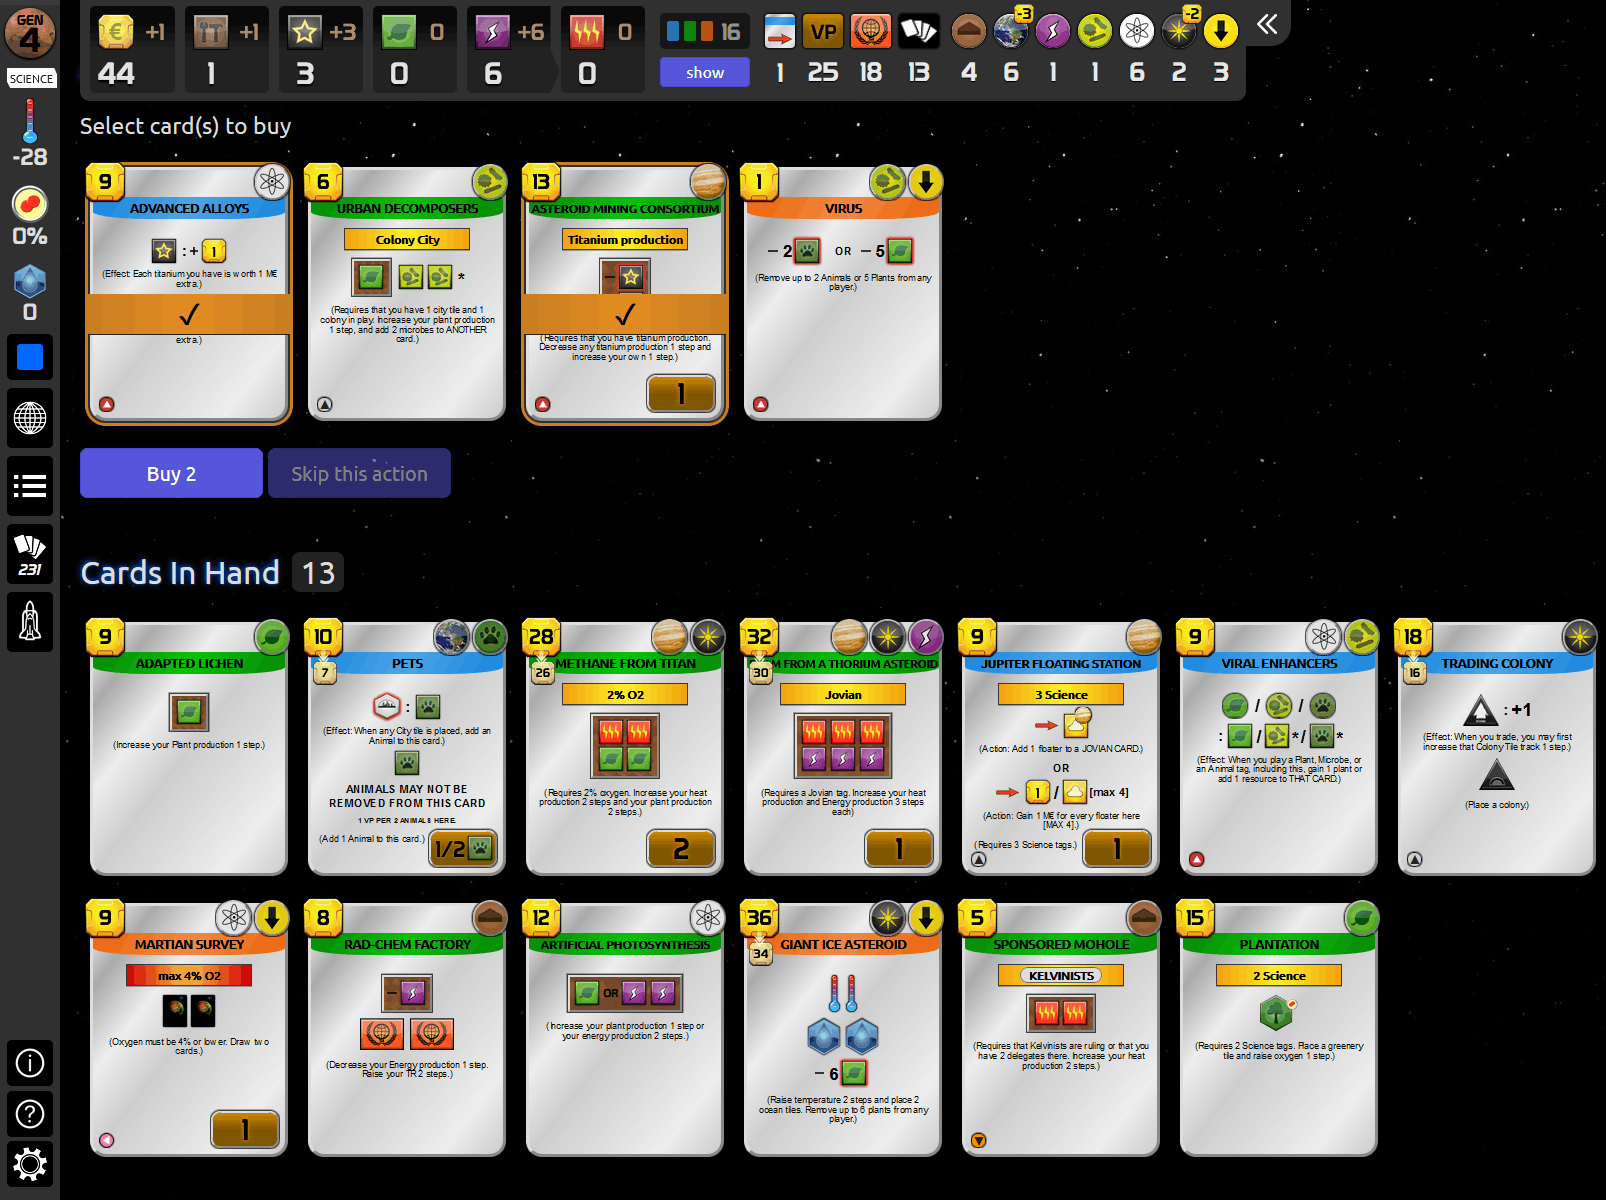
Easy calls to keep here: Advanced Alloys as an engine component, and Asteroid Mining Consortium both for production and Jovian scoring.
The Scientists party is in power from the previous election. This enables their unique action: pay 10 credits to draw 3 cards. I'm not completely certain that that's the best call as compared to continue building up productivity, but I can't resist going for it, grab more cards while I can since it might be a while until they come to power again.
Trading Colony is my important engine card to play. It can't go on Pluto, but has an important effect there, the free track increase gets the marker up to the 3 slot for an additional card, and will do so every generation. And my other engine component now in place is the energy from Mass Converter, so I can spend that to trade instead of titanium. Here we go:
- Turmoil scientists action
- Draw Research, Tundra Farming, Moss
- Trading Colony
- Place colony on Io
- Trade Pluto (spend 2 energy)
- Draw Cupola City, Lava Tube Settlement, Ice Cap Melting, Micro Mills, Big Asteroid
- Discard Cupola City, Tundra Farming
- Asteroid Mining Consortium
- Micro Mills
Micro Mills probably wasn't worthwhile, but it was hard to resist a cheap card already in hand. I discarded Cupola City, because I've found that city cards really don't help in solo. The productivity isn't enough to justify the cost, unless you really have a ton of surplus steel with no other spending outlet. Much of any city's value is tied up in point-scoring that doesn't matter until the end of the game. You can just standard-project cities later (particularly with Credicor's rebate), and so it's not worth investing in city cards along the way, except for the few with unique effects.
Turmoil: Greens are leading, but I get nothing from either the party payout (no green tags) or policy (no greeneries coming next round.) I can swing the election to Unity with the free delegate plus one bought one, and that's absolutely worth doing: I get the chairman TR, the Unity party payout will give 6 credits for my Earth tags, the two influence is worth two titanium from the event, which even gets boosted next round by the Unity policy!
Generation 5
I neglected to grab a screenshot, but the only card worth keeping was Atmo Collectors. I expected it would be worth playing to use for the titanium on this Unity round, and it was.
- Trade Pluto (spend 2 energy)
- Draw Urbanized Area, Water Import From Europa, Asteroid Mining, Technology Demonstration, Nitrophilic Moss
- Discard Moss, Nitrophilic Moss
- Advanced Alloys
- Mars U trigger discard Ice Cap Melting, draw Nuclear Zone
- Big Asteroid (pay 5 titanium, get back 4 titanium)
- Trigger Credicor rebate
- Atmo Collectors
- Atmo Collectors action: gain 2 titanium
- Asteroid Mining (overpay titanium)
- Trigger Credicor rebate
- Rad-Chem Factory
Solid development here. Nice to see one of the Jovian multipliers (Water Import), though it's not necessary to play until the end. Asteroid Mining is good productivity and also Jovian, plus Technology Demonstration to play when I want more cards. Rad-Chem Factory is often mediocre, but fine to play here, when I already had the energy and some unspent steel.
Turmoil looks very similar to the previous round. The Greens still don't help me, so the move is to crush another party instead, Scientists. Notice what I'm really doing - using that neutral delegate as leverage in my favor to help elect a party I want more. The influence isn't all that great this round (2 plants); most of the benefit is in getting the party payout for science tags (7); that plus the TR is worth the cost.
Generation 6
Nothing worth buying there. Aquifer Pumping is great in most solo games, but when you have a huge draw engine going, you'll draw into plenty of ocean events. Tardigrades is too small to care about, since I know I'll draw into a better microbe card for any microbe adders.
- Trade Pluto (spend 2 energy)
- Draw Adaptation Technology, Space Station, Inventors Guild, Political Alliance, Lichen
- Discard Adaptation Technology, Political Alliance
- Turmoil scientists action
- Draw Community Services, Noctis Farming, Birds
- Space Station
- Technology Demonstration
- Draw Farming, Extreme-Cold Fungus
- Olympus draws Standard Technology
- Mars U discard Sponsored Mohole, draw Food Factory
- Beam From A Thorium Asteroid
- Trigger Credicor rebate
- Community Services (+5 credit income)
- Lichen (pay with Psychrophiles)
Didn't turn up much from card drawing, though Space Station is a useful engine component. Standard Technology we'll want later but it'll be a long time until we care about that. I got some minor productivity increases from the Thorium Asteroid, Community Services, and Lichen.

Turmoil: Three parties have 2 delegates each. I could crush any of them, or let Greens win. Greens still do nothing for me. I decided to crush Mars First, the payout for building tags (5) is alright, and next round I can do Giant Ice Asteroid for the steel payout from the policy.
Generation 7
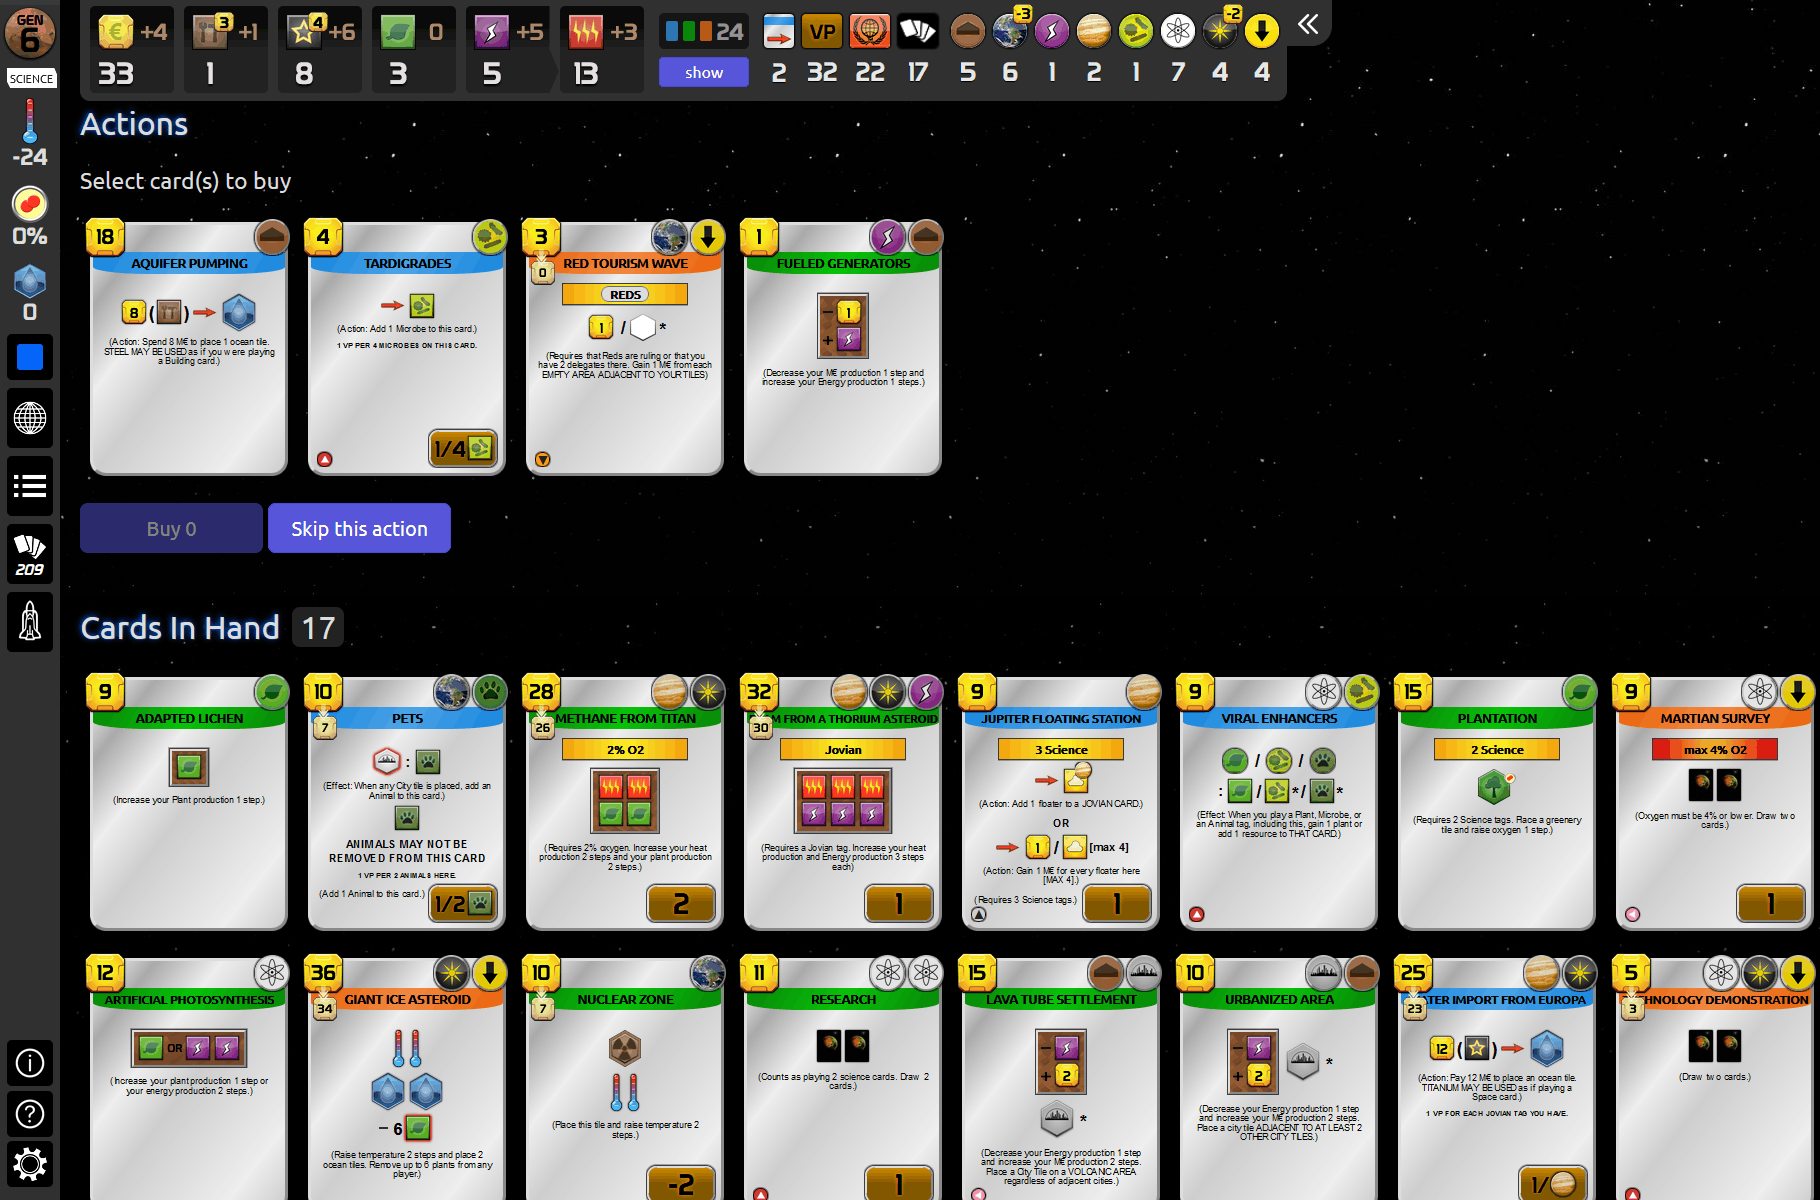
There's the monster, AI Central! And Productive Outpost is also easy card draw from the Pluto colonies. I have to say no to the other two cards; they're science tags, but only minor points and too expensive to carry along for now, I'm way backlogged on playing 21 cards in hand and I'm only going to get more.
- Trade Pluto
- Draw Space Port Colony, Quantum Extractor, Floater Prototypes, Titan Floating Launch-Pad, Ice Moon Colony
- Discard Food Factory, Lava Tube Settlement
- Floater Prototypes
- Add 2 floaters to Atmo Collectors
- Mars U discard Adapted Lichen, draw Strip Mine
- Atmo Collectors action: 2 titanium
- Giant Ice Asteroid
- Trigger Credicor rebate
- 2 steel from Mars First policy for the oceans
- Place oceans on titanium and card spaces, draw Robotic Workforce
- Strip Mine
- Trigger Credicor rebate
- Robotic Workforce (copy Strip Mine!)
- Olympus draws Callisto Penal Mines
- Mars U discard Noctis Farming, draw Solar Power
Some nice combo action going here. Strip Mine is big productivity and I got to copy it with Robotic Workforce! And Floater Prototypes came in at the perfect time to keep Atmo Collectors rolling instead of having to recharge its own floater. (Thorium Asteroid last round wasn't so minor, I needed the energy production for this.) I couldn't afford to get AI Central going after that, but we will next time.
Turmoil: Letting Kelvinists win wouldn't do much; crush Unity is an easy call with 8 titanium production now after the double Strip Mine. Same as before, I'm using the neutral delegate to help me leverage the party I want over the one I don't -- that neutral delegate is actually helping me.
Generation 8
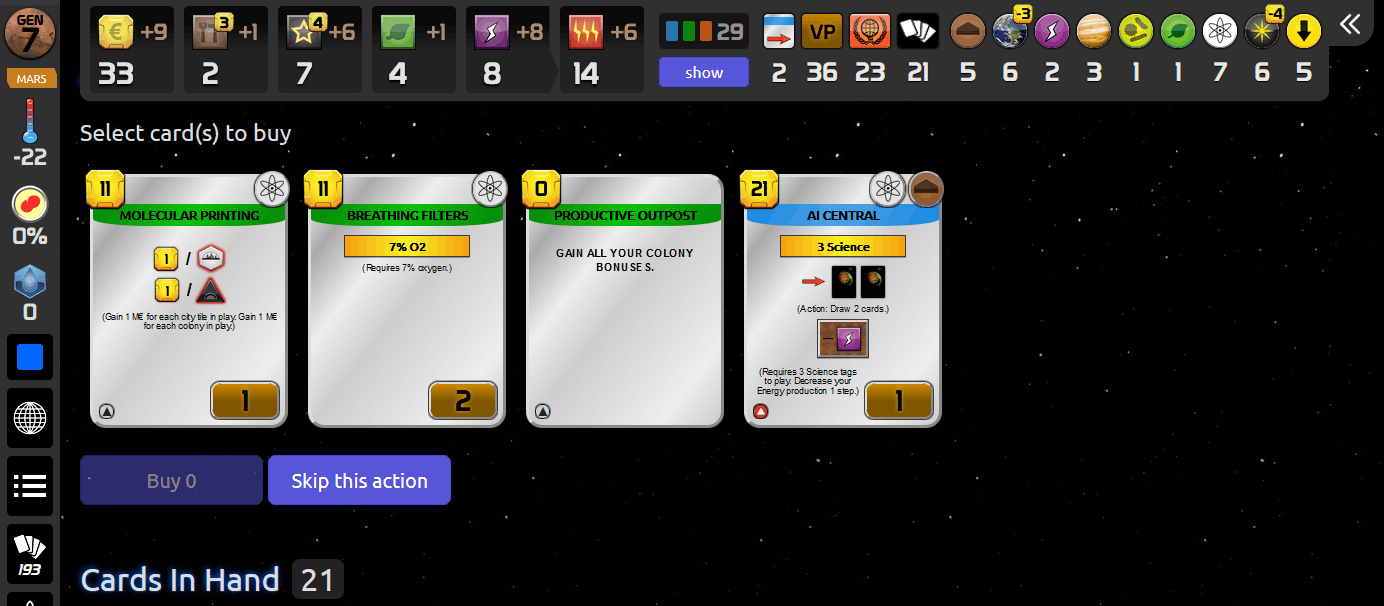
Good stuff here, finally get one of the universal discounts in Research Outpost, and even when we have steel to build it. And this is exactly when you want Lunar Mining, with a number of earth tags built up, but still plenty of time left to use the production.
- Pets
- Research Outpost
- Place city on Hecatus Tholus for titanium
- Mars U discard Solar Power, draw Rad-Suits
- Space Port Colony
- Trigger Credicor rebate
- Place colony on Pluto (now triple colonized)
- Draw Space Port, Power Supply Consortium
- Trade Pluto (spend 2 energy)
- Draw Martian Media Center, Quantum Communications, Lake Marineris, Decomposers, Optimal Aerobraking, Large Convoy
- Discard Power Supply Consortium, Rad-Suits, Martian Media Center
- Atmo Collectors action: 2 titanium
- Quantum Extractor
- Olympus draws GMO Contract
- Mars U discard Ice Moon Colony, draw Steelworks
- AI Central
- Trigger Credicor rebate
- Mars U discard Nuclear Zone, draw Permafrost Extraction
- AI Central action
- Draw Galilean Waystation, Wildlife Dome
- Callisto Penal Mines
- Trigger Credicor rebate
- Methane From Titan
- Trigger Credicor rebate
- Trade Io (spend 2 energy for 15 heat)
- Lunar Mining (+4 titanium production)
- Quantum Communications (+4 income)
- Galilean Waystation (+5 income)
After Research Outpost, the one major engine component was Space Port Colony to triple-up on Pluto. Besides that, again just played out a number of productivity increases.
Turmoil: Kelvinists still don't do me much good, so it's an easy crush of Scientists. Same as before, use the neutral delegate to help me swing it, while overcoming him to take party leadership for myself.
Although the event makes me discard two cards, which will be Permafrost Extraction and Steelworks. Both of those are weak terraforming cards; I'll accumulate plenty of other ocean events and plants for oxygen as I continue to draw through the deck.
Generation 9
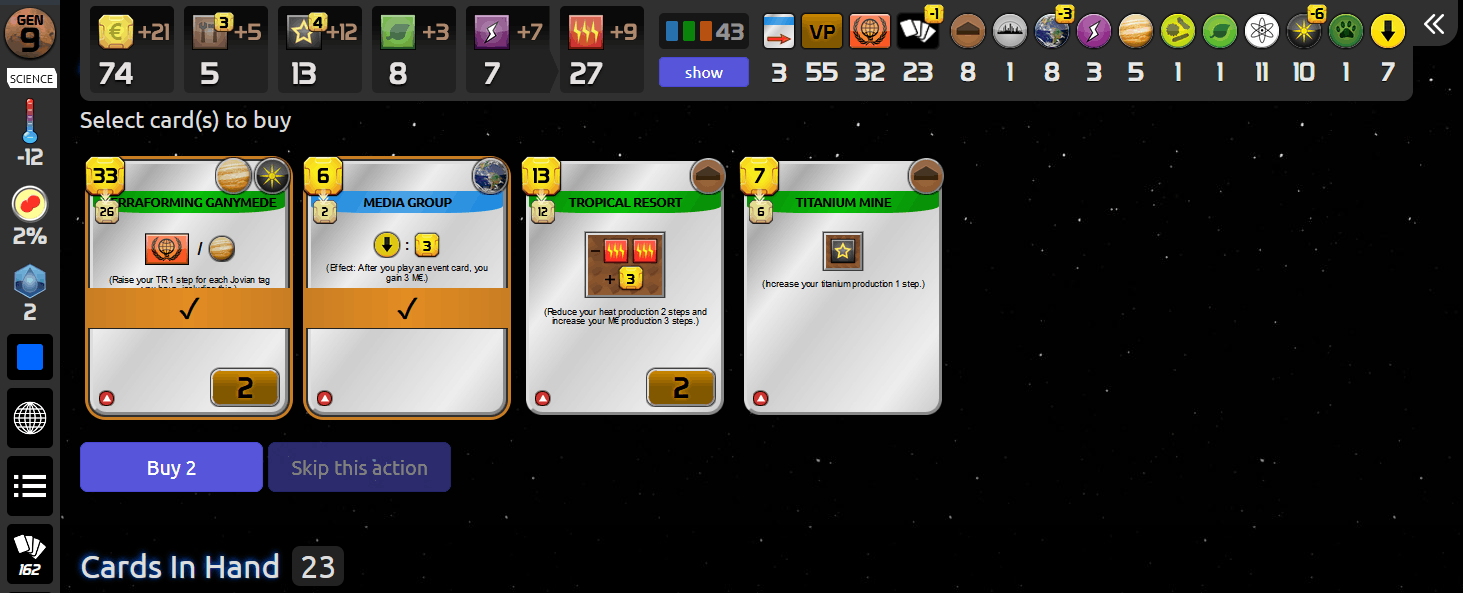
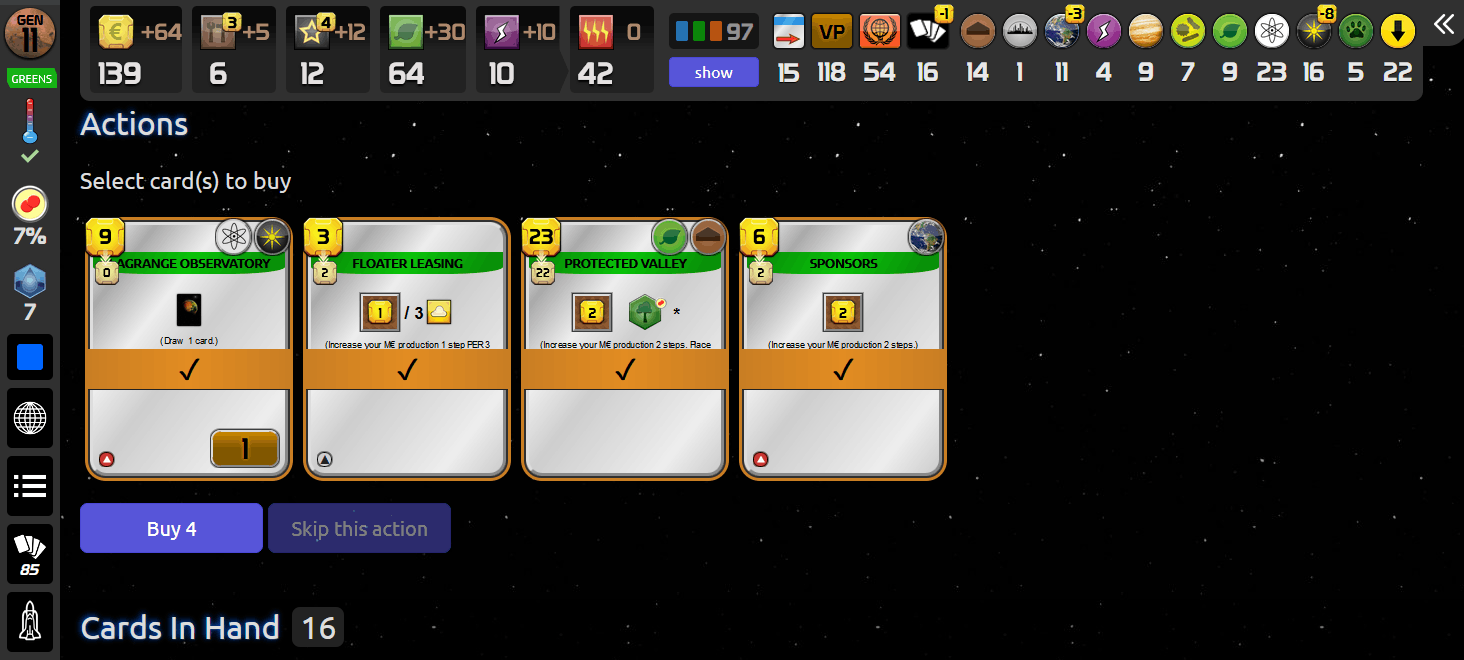
Two easy buys there. Bit late for Titanium Mine, since after Lunar Mining I think my titanium production is likely to overshoot what I can spend.
This is the round where I can break through and really play out lots of the bulk that's been accumulating in my hand. Here we go. First start with all the card drawing. Then play Media Group and Optimal Aerobraking for the rebates on all the events. (I'm not going to bother writing out every time they trigger.)
- Turmoil scientists action
- Draw Martian Rails, Small Animals, Eos Chasma National Park
- AI Central action
- Draw Ore Processor, Insulation
- Trade Pluto (spend 2 energy)
- Draw Ice Asteroid, Nitrite Reducing Bacteria, Invention Contest, Underground Detonations, Capital, Protected Habitats
- Discard Underground Detonations, Nitrite Reducing Bacteria, Protected Habitats
- Media Group
- Invention Contest
- Trigger Media Group
- Draw Convoy From Europa
- Olympus draws Comet
- Mars U discard Ore Processor, draw Shuttles
- Optimal Aerobraking
- Convoy From Europa
- Draw Electro Catapult
- Trigger Media Group and Optimal Aerobraking
- Comet
- Trigger Credicor rebate
- Trigger Media Group and Optimal Aerobraking
- Productive Outpost
- Draw Kelp Farming, Trees, Solar Probe
- Discard Martian Rails, Space Port, Small Animals
- Research
- Draw Power Infrastructure, Fusion Power
- Olympus draws Ecological Zone
- Mars U discard Power Infrastructure, draw Business Contacts
- Mars U discard Birds, draw Import of Advanced GHG
- Business Contacts
- Draw Titan Shuttles, Industrial Microbes
- Comet
- Trigger Media Group and Optimal Aerobraking
- Ice Asteroid
- Trigger Credicor rebate
- Trigger Media Group and Optimal Aerobraking
- Import of Advanced GHG
- Trigger Media Group and Optimal Aerobraking
Here's my hand after all that, I drew a total of 25 cards there! And I got a lot of cash rebates from Credicor, Media Group, Optimal Aerobraking, and from placing oceans adjacent to each other -- I've got 26 credits more than when the round started.
Now my plan is to play out all the green tags. This starts with putting two delegates in the Greens party to enable GMO Contract, which is a nice rebate on each. Then all the green-tag triggers: Viral Enhancers, Decomposers, Ecological Zone. (And I'm not going to bother writing out every trigger for every one of those either.)
- Lobby Greens
- Buy delegate to Greens
- GMO Contract
- Mars U discard Industrial Microbes, draw Lunar Beam
- Viral Enhancers
- Olympus draws Indentured Workers
- Mars U discard Lunar Beam, draw Sub-Zero Salt Fish
- Spend 8 plants to place greenery on Elysium Mons (to raise oxygen to 3% for Decomposers)
- Decomposers
- Ecological Zone (pay with Psychrophiles): trigger twice each for itself, Decomposers, Viral Enhancers, and GMO Contract
- Kelp Farming (we just happen to be at 6 oceans now)
- Eos Chasma National Park
- Extreme-Cold Fungus (use its action to add to Decomposers)
- Spend 8 heat five times, to raise temperature to 0°
- Trees
- Sub-Zero Salt Fish (from the Viral Enhancers trigger, take a plant rather than an animal, since Salt Fish's own actions will come out to an even number of 4 animals across 4 generations)
Still have 54 money left after all that, I can go for some more draws. Also from here I'm not going to write out every detail of the Olympus and Mars U triggers, just report what's important that I got.
- Martian Survey
- Draw Mining Colony (then discarded), Gene Repair
- Gene Repair
- Draw Ants, Herbivores
- Inventors Guild
- Draw House Printing, Impactor Swarm
- Impactor Swarm (I don't need the heat, but it's a net profit after Media Group and Optimal Aerobraking, and gets to 4° to enable Farming this round)
- Electro Catapult
- Trade Callisto (2 energy for 13 energy, no reason not to)
- Spend 8 plants for greenery (to reach 4% oxygen for Ants)
- Ants
- Farming
Turmoil: I pretty much have it planned out for the rest of the game. I'll let the Kelvinists win this round, rather than trying to overcome 4 neutral delegates every round. From here I know all the remaining steps: next round I'll have the Greens win, and then the last election will be Unity again, helped by that incoming neutral delegate on the event card currently in the middle slot. So my lobby delegate for this round goes into Unity for later; not Greens now since that would make them win too early, I want their round to come later when I have more plants to place.
Generation 10

Gotta keep all four! The animal cards are easy cost-efficient points, including all the green-tag triggers. (I discarded Birds earlier since I thought it would come too late to be worth it, but probably should have kept it.) And despite what I said about city cards before, Immigrant City is fine here, it's quite a bit cheaper than a standard project, and it's not going to tie up money sitting in hand for long.
I overlooked something for the previous two rounds: I forgot I had Trade Envoys and should have played it before trading Pluto. This is a second free track increase when trading. With three colonies on Pluto, that pushes the marker all the way to the max of 4 cards from trading every round. I'll fix and execute that now.
- AI Central action
- Draw Media Archives, Floater Technology
- Trade Envoys
- Trade Pluto
- Draw Imported GHG and nothing else playable
- Imported GHG (just to trigger the event rebates)
- Floater Technology
- Draw Deimos Down (hah, temp is already maxed), Nitrogen-Rich Asteroid (nice!)
- Nitrogen-Rich Asteroid (temp is maxed but who cares, take the 4 plant prod and happy to spend titanium to get cash rebates, including Credicor)
- Development Center
- Draw Miranda Resort, Lunar Exports
- Standard Technology
- Draw Event Analysts, Physics Complex
- Artificial Photosynthesis (for plant production)
- Draw Towing A Comet
- Towing A Comet (again to spend titanium for cash rebates including Credicor, and to reach 5% oxygen for:)
- Shuttles
- Fusion Power (science triggers drew nothing useful)
- Physics Complex (even though no energy to use it this round)
- Draw Insects (YES)
Turns out my no-reason-not-to trade with Callisto last round actually did have a reason not to - if I'd left the energy there, I could have traded for it this round in order to use Physics Complex, oh well. Anyway, I was playing all those science tags just for the draw triggers now -- and for one other purpose, Solar Probe. Now it was time to pop that, with 24 science tags including itself, to draw 8 cards.
- Solar Probe
- Draw 8 cards, but most aren't useful, best are Bushes and Immigration Shuttles
- Bushes
- Plantation (this was going to wait until the Greens round, but the plant tag to be counted by Insects is more important than the rebate)
- Wildlife Dome (same, and also raises oxygen to exactly 6% for Insects)
- Aerobraked Ammonia Asteroid (again spend titanium for the event and Credicor cash rebates, but the heat production will also go into Insulation)
- Lunar Exports (for plant production)
- Immigration Shuttles
- Miranda Resort (+11 income for earth tags)
- Insects (+9 production for plant tags)
- Indentured Workers (worth the -1 point after the Media Group rebate)
- Insulation (convert 15 heat production to credits production)
- Recruitment (swing Green party leadership to me for no cost)
Then the last piece this round is to finally start up some floater action.
- Titan Shuttles
- Titan Floating Launch-Pad
- Airliners
- Jupiter Floating Station
All available floaters (9 this round) went onto Titan Shuttles, to convert to titanium later. I would prefer Jovian Lanterns as the target (1 point per 2 floaters), but we didn't find that yet. I'm not going to try to accumulate floaters on Jupiter Floating Station; I would only get to use its money action three times, which would be total value of only 3 credits per floater, plus the opportunity cost of not adding its own floater somewhere else.

Turmoil: Greens are winning as I planned, and I used Recruitment to take the party leadership. So my lobby delegate can go to Unity instead, to make them win for the following election which will be the last.
Also notice that event there - remove an ocean tile. There's a note in the rules that this doesn't happen if oceans are already maxed. I could make that happen (make the removal not happen), by playing Large Convoy this round (I've got a 1 VP-per-animal recipient for the animals, in Fish.) But no - I actually want that ocean to get removed, so I can get the card placement bonus over again! The replacement ocean could be done by Water Import From Europa on the last round, if I don't draw another ocean worth playing. (I've learned in these big solo games that you want to chuck out a lot of ocean cards, because enough card drawing will easily overshoot them. I've already tossed all of Black Polar Dust, Ice Moon Colony, Subterranean Reservoir, Permafrost Extraction, Ice Cap Melting, Aquifer Pumping, and even Lake Marineris.)
Generation 11
Keep all four cards again; Sponsors can't be positive value with only one round to go, but at this point I do need a few dead cards just for discard chaff to Pluto and Mars University.
Also, one other thing to call out from that screenshot: yes, that is THIRTY plant production up top. I had been slightly worried about having to scramble for greeneries - but there are a lot of plant production cards with various requirements, particularly Insects and Nitrogen-Rich Asteroid, and now I've got plenty of those in place.
- AI Central action
- Development Center action
- Inventors Guild action
- Trade with Pluto
- All the drawing got mostly junk, except Sky Docks, finally another discount
- Sky Docks
- Large Convoy
- 4 animals to Fish
- Trigger Credicor, Media Group, Optimal Aerobraking rebates
- Draw Spin-Off Department
- Hired Raiders (steal 2 steel)
- Spin-Off Department (finally got the best card drawer, late but not too late to get good use from it)
- Lagrange Observatory
- Draw Noctis City (not special on this map, behaves as a standard city)
- Immigrant City (need to do this before:)
- Domed Crater (must do this now before oxygen exceeds 7%)
- Protected Valley
- Herbivores (with oxygen at 8%)
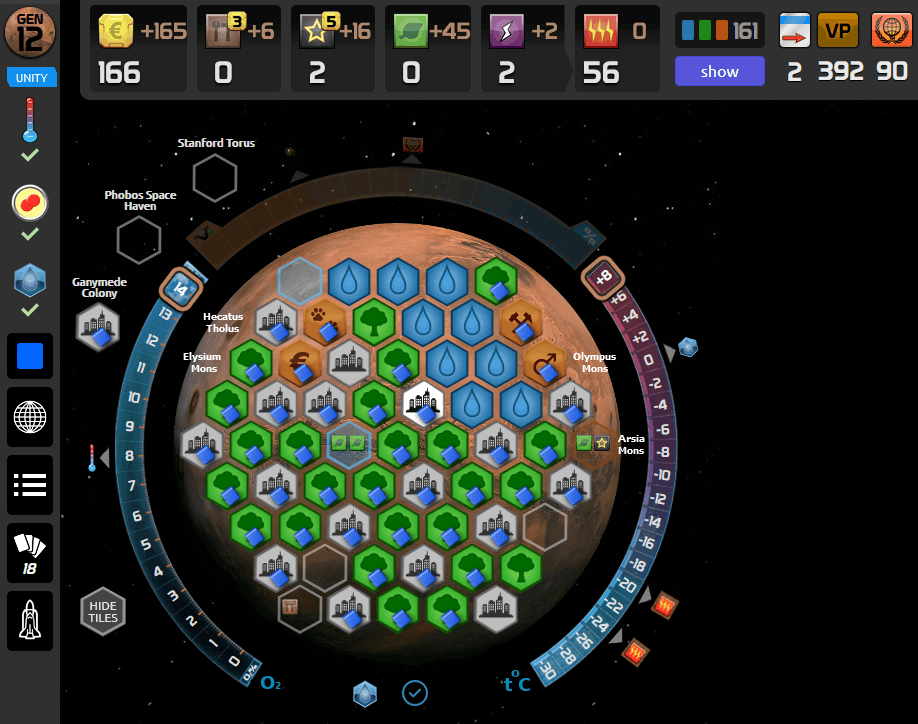
Now the board looks like this:
And now I have 72 plants to place on the board, for what will be a total of ten greeneries, after picking up more plants from tile placements. Each one of these triggers a 4 credit rebate from the Greens party, plus also Herbivores for half a point.
I continue on with some more cards:
- Vesta Shipyard
- CEO's Favorite Project (Physics Complex of course)
- Security Fleet (and use its action)
- Livestock
- GHG Producing Bacteria (costs 4 after GMO Contract rebate, solely for the triggers: microbe for Decomposers and Viral Enhancers, science for Olympus and Mars U)
- Draw Jovian Lanterns
- Jovian Lanterns (this will take all floaters from now on)
- Space Elevator (after the space discounts and two rounds of its own action, this costs a net of 4 for 2 points plus a Spin-Off trigger, worth it)
- Draw Space Hotels
- Space Hotels (discounted to 0, so hey free money plus one more earth tag for Unity this round)
- Special Design (solely for the Media Group rebate and science tag triggers)
- Draw Ecology Research
- Ecology Research, this is a fun one:
- 4 plant production
- 1 animal to Fish
- 2 microbes to Ants
- 3 triggers for Decomposers and Viral Enhancers
- 2 triggers for Ecological Zone
- Trigger Credicor's rebate
- Trigger Olympus, Mars U, and Spin-Off
- Great Dam (need some energy for:)
- Equatorial Magnetizer (cost 9 for 2 points, worth it)
- Commercial District
- Lightning Harvest (also a point, and cheap energy for:)
- Urbanized Area
- Mining Rights
- Place tile on the 2 steel spot top-right, plus also 4 credits for oceanside
- Floater Leasing (cost 1 for +6 income, that's net profit)
- Research Coordination (going to want the wild tag for Terraforming Ganymede, so play it now to be counted by:)
- Cartel (cost 3 for +15 income)
I still had some money after playing all that. Now it's time to do some standard-project cities. I'm going to need some of those to fill up the board, so may as well do that now, for the income from each city action itself plus Immigrant City. (That 2 income for one round would be equivalent to waiting for Rover Construction, so doing it now is correct in case Rovers doesn't show up.) I could afford three standard project cities this round, which went on spaces for enough plants for one extra greenery too while still in the Greens round.
One more card to play this round, after those cities:
- Zeppelins (11 cost for +9 income for one round, so it's net cost 2 for one point, worth it)

Turmoil (and also a look at the board after all the greeneries and cities): Lobby and buy one delegate for Unity. This will collect me 25 credits worth of planet tags, plus another 25 more worth of enhanced titanium (we have a bunch to cash in from Titan Shuttles.)
Generation 12
Investment Loan is obvious, Predators should be positive value (2 5/6 points from itself, Viral Enhancers, Ecological Zone, and Decomposers triggers, for 13 net cost after GMO Contract), and keep the other two anyway for Pluto discard fodder.
- Use the card draw actions and trade Pluto
- Relevant draws: Io Mining Industries, Interstellar Colony Ship, Rover Construction
- Interstellar Colony Ship (to get the Spin-Off draw)
- Water Import From Europa (same, drew Cultural Metropolis)
- Rover Construction
- Cultural Metropolis (very cool, the Unity requirement is already satisfied, and the two delegates can go into Reds to enable Diaspora Movement)
- Capital (draw Warp Drive from Spin-Off)
- Warp Drive (science trigger draws Earth Catapult at long last!)
- Earth Catapult (draw Imported Hydrogen)
- Io Mining Industries, draw Search For Life (got excited about the science tag, but it's obsolete by oxygen requirement)
- Place greeneries on the two card spaces in the south (draw Magnetic Field Generators and Heavy Taxation)
- Magnetic Field Generators, draw Supported Research
- Lobby Scientists delegate and buy another
- Supported Research (relevant draws: Trans-Neptune Probe and Interplanetary Colony Ship)
- Trans-Neptune Probe
I'm almost out of ways to draw cards, but got a few tricks left:
- Deimos Down (for no temperature increases! Entirely to burn titanium and get the event rebates and Spin-Off; draw Imported Nitrogen)
- Imported Nitrogen
- Place greenery on the top-right card space, draw Medical Lab
- Medical Lab (entirely for the science trigger and 1 point, draw Red Spot Observatory)
- Red Spot Observatory (draw Ganymede Colony)
- Red Spot's action (after adding a floater from Floater Tech, draw Advanced Ecosystems)
- Ganymede Colony
- Diaspora Movement
- Terraforming Ganymede (+18 TR from Jovian tags plus the one wild)
My very last way to draw a card was Terraforming Ganymede for the Spin-Off trigger, but it was nothing.
So clean out the rest of my hand, starting with the events up to Media Archives:
- Martian Zoo (actually missed playing this earlier for a couple earth triggers)
- Investment Loan
- Interplanetary Colony Ship (I deliberately didn't play any other colony cards and left a space open on Callisto for this)
- Imported Hydrogen
- Market Manipulation
- Release of Inert Gases
- Local Heat Trapping (for 2 Fish)
- Media Archives (for 35 credits)
- Advanced Ecosystems
- Algae
- Worms (+6 plant production)
- Giant Space Mirror (just to get the energy production for:)
- Soil Factory
I was left with six cards of no playable value, to sell for patents.
I now had another 40 plants to place greeneries, which I did. After that, there were four open spaces left for greeneries, which I could fill with the plant production after the last round. And then I also filled up the remaining city spots, with Noctis and about five standard-project cities.

Turmoil: At the end of the last round, each party leader position is worth one point. I now filled the vacant Unity position, of course. Sadly, I can't get any more party leaders, because you're only allowed 7 delegates total including the chairman (because that many physical pieces come with the board game); only one of mine is left in the reserve there, which isn't enough to overcome any other party. The two delegates each that I put into Scientists and Reds to enable cards have to just stay there. (I wish you could still pay 5 to place a delegate by reallocating an existing one if necessary.)
The very last thing to do is spend down my 166 remaining credits on Buffer Gas standard projects, which cost 13 each after the Standard Technology rebate. That adds 12 final TR, and we're done.
There are 18 cards left in the deck, according to that tracker there. I missed out on two that I would have wanted: Anti-Gravity Technology of course, and Mangrove to fill in a greenery on that other ocean space sticking out in the middle there. That's all I can recall that I missed; I got every other important engine and scoring component in the deck, including all four Jovian multipliers.
Final Scoring
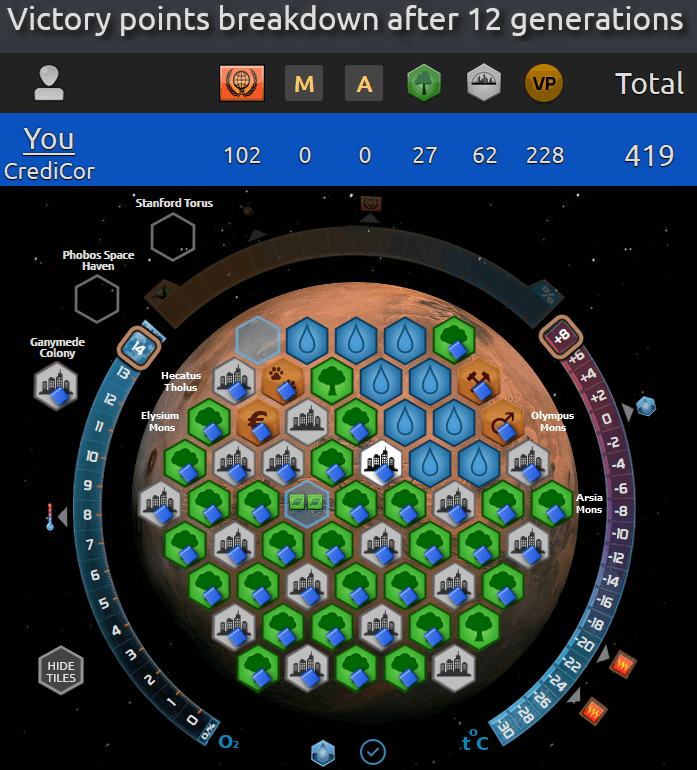
419 points.
I'll talk a little bit about how to arrange the board layout for maximum score. The pattern you see here is the most efficient way to do that: every greenery is adjacent to three cities, and every city is surrounded by greenery on all sides. (Besides that region with Urbanized Area and Commercial District, arranged to take advantage of the neutral city.)
But the right way to look at this isn't exactly to maximize cities or greeneries. What you are trying to maximize is city-greenery adjacencies, since that's really what scores a point. This is helpful to figure out how to evaluate the edge of the map. It's correct to fit as many cities as possible in edge spots, since that minimizes the number of greenery-greenery adjacencies along the edge. Also, this shows how the ocean arrangements on this board and Hellas are better than on base Tharsis; ocean-ocean adjacency is good, because that means fewer city-ocean and greenery-ocean adjacencies, which come at the expense of a city-greenery adjacency.
And this is the breakdown of the 228 VP, starting with the Jovian multipliers, and in descending order through the resource accumulators and then the static VP cards.
17 Io Mining Industries
17 Water Import From Europa
15 Fish
13 Ecological Zone
12 Decomposers
12 Herbivores
9 Ants
8 Pets
6 Immigration Shuttles
6 Jovian Lanterns
6 Physics Complex
4 Commercial District
4 Earth Elevator
4 Interstellar Colony Ship
3 Advanced Ecosystems
3 Livestock
2 Methane From Titan
2 Red Spot Observatory
2 Callisto Penal Mines
2 Capital
2 Earth Catapult
2 Farming
2 Gene Repair
2 Large Convoy
2 Predators
2 Security Fleet
2 Sky Docks
2 Space Elevator
2 Space Port Colony
2 Sub-zero Salt Fish
2 Terraforming Ganymede
2 Warp Drive
1 AI Central
1 Airliners
1 Asteroid Mining Consortium
1 Beam From A Thorium Asteroid
1 Cryo Sleep
1 Diaspora Movement
1 Domed Crater
1 Ecology Research
1 Electro Catapult
1 Eos Chasma National Park
1 Galilean Waystation
1 Great Dam
1 Jupiter Floating Station
1 Kelp Farming
1 Lagrange Observatory
1 Lightning Harvest
1 Mars University
1 Martian Survey
1 Martian Zoo
1 Medical Lab
1 Miranda Resort
1 Natural Preserve
1 Quantum Communications
1 Research
1 Rover Construction
1 Shuttles
1 Soil Factory
1 Solar Probe
1 Space Station
1 Titan Floating Launch-pad
1 Titan Shuttles
1 Trans-Neptune Probe
1 Trees
1 Vesta Shipyard
1 Zeppelins
-1 Conscription
-1 Indentured Workers
3 Turmoil Points
This was by no means a perfect game. It's possible to snowball quite a bit harder and earlier, of course if the big discounts (Earth Catapult and Anti-Gravity) had come up sooner. I decided to use this game for the writeup because the most important part, the card drawing, came together about as well as could possibly be expected from a completely random and not forced setup. Double Pluto early, triple soon later, the Olympus and Mars U triggers, and then AI Central just at the right time to afford it. The only thing missing from card draw was Spin-Off Department; if that had come earlier I would have gotten through the entire deck, though it still paid off decently well after coming two-thirds through.
And a lot besides the card drawing went well too. I got several of the big scaling cards at the right time, when you have enough stuff played to make them good but enough time left to use the production, particularly Lunar Mining and Solar Probe. I got a lot of the accumulating triggers early, Viral Enhancers and Decomposers and Ecological Zone. Also some of the engine cards, notably Optimal Aerobraking and Advanced Alloys. Also the two biggest energy producers early (Mass Converter and Quantum Extractor) so I didn't have to waste resources on power. Finally, I got good Turmoil events for the first five generations, and only a couple minor negative ones later.
So the difference between this game and perfection was merely of degree. Everything that needs to happen did so in this example game: draw a ton of cards, ramp up productivity, and fill the board, so that you get into the endgame points dump of Buffer Gas. The only things that could score any more than what I did here would be to deploy the resource-VP accumulation cards sooner, draw more in order to reshuffle the discards to pick any stray point cards back up, and rack up more cash for extra Buffer Gas at the end.
For colonies, Io and Callisto were pretty useless in this game. Pluto is the star, but beyond that I'm actually not sure what's best, and in this case actually probably should have kept Enceladus instead of Callisto to gain a few extra points from the microbes. I'm actually not sure what would be ideal overall for scoring, if it would be Luna and Ceres for productivity, or something like Titan and Miranda to put those resources on point-scoring cards. Probably the latter if the game was perfect enough, though I'm not sure if this was.
This game was configured with Prelude, Colonies, and Turmoil. It's possible to add Venus Next; I'm pretty sure that that would reduce the average score outcome by diluting the deck away from the good stuff, but raise the ceiling with more productivity and points cards (particularly Venusian Animals) if they come in a good enough order. The same goes for the batch of promo cards that also exists; a lot of useless junk, but a few spiky outliers that can score a bunch. Although if you put everything together, the deck bloats to over 360 cards, and that takes a ton of draw power indeed to churn through.
That's all here. Thanks for reading, and let me know if you might be inspired to try some of this yourself too.