Here's a report of a shieldless win on Hard difficulty in FTL.
Stealth A is the ship of the day, and I'll say a few words on that before getting into the shieldless run itself.
The plight of the shieldless Stealth ships is often cited as the biggest random-number-based swing in FTL. An early enemy drone can cut you to pieces before you ever get to fire your weapons or escape from the fight, in such a way that there's nothing possible to do to save yourself. This can be true, but actually quite rarely, not nearly as much as folks say. Because of the following tactic:
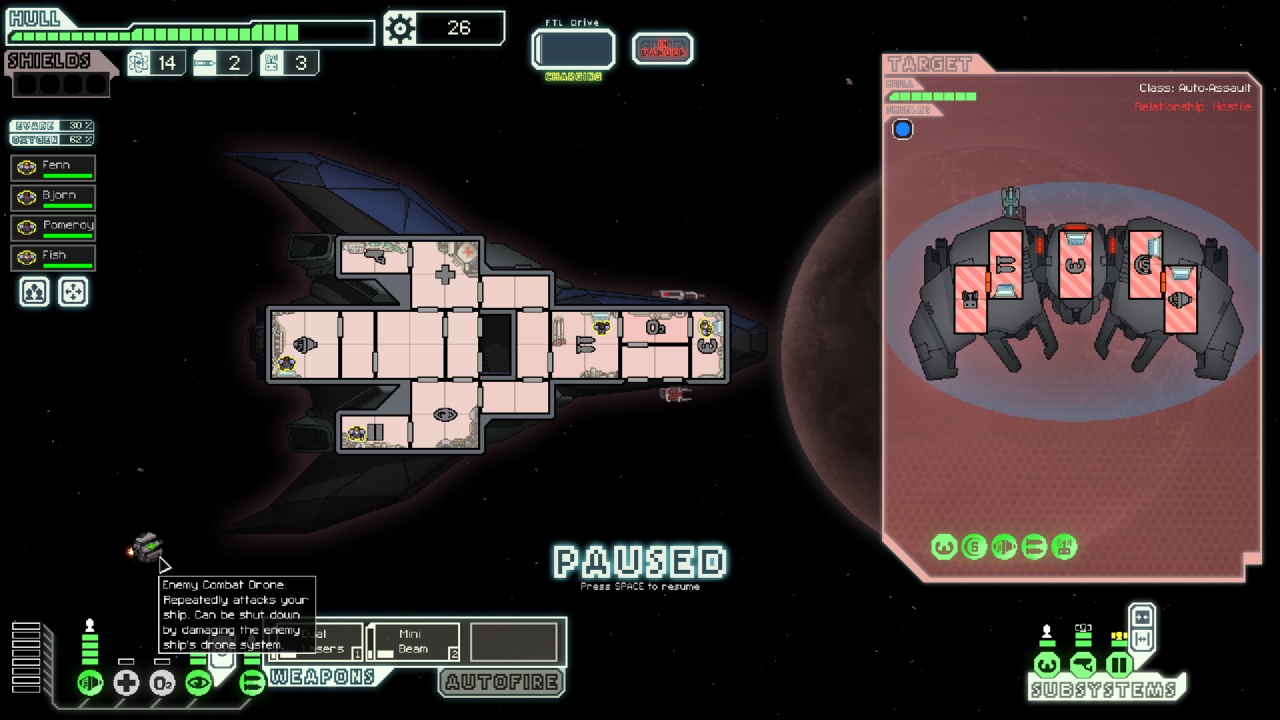
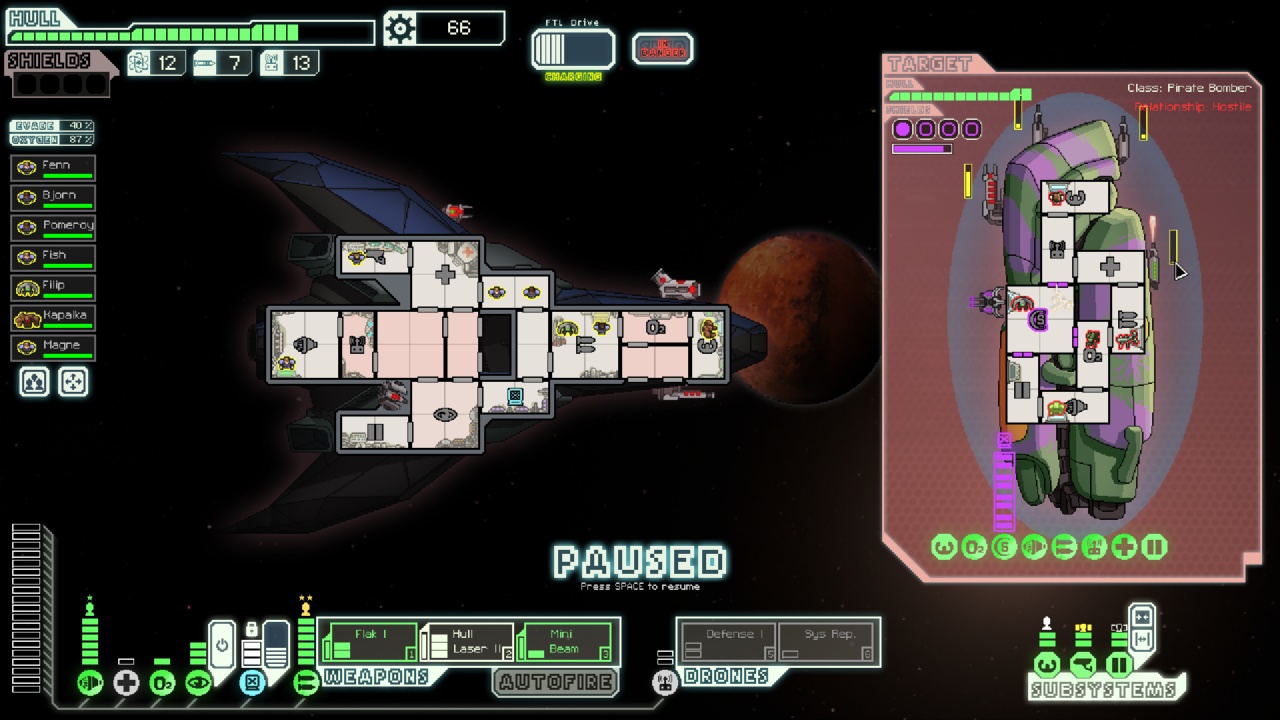
Watch the enemy drone and cloak only when it is about to shoot something important. Pause at the right moment and look at the drone's alignment to figure out its target. A drone always shoots at the exact center of its target room, so usually there are only a very few possibilities. Here, my cloaking and weapons are both in the line of fire, so NOW is the right time to cloak. But if the drone were pointed at something inconsequential like sensors or doors, the right move would be to let that shot hit and save the cloak for when it will also dodge an enemy weapon along with the drone.
With this tactic, the Stealth ships become immensely more survivable in the early game. I read about this tactic over on Reddit, went to try it out, and won five consecutive runs on Hard with a mix of Stealth ships.
Anyway, on to the run. I wasn't intending at the outset for any kind of variant play. But as the pieces fell into place, I grabbed my opportunity for the accomplishment of a shieldless victory.
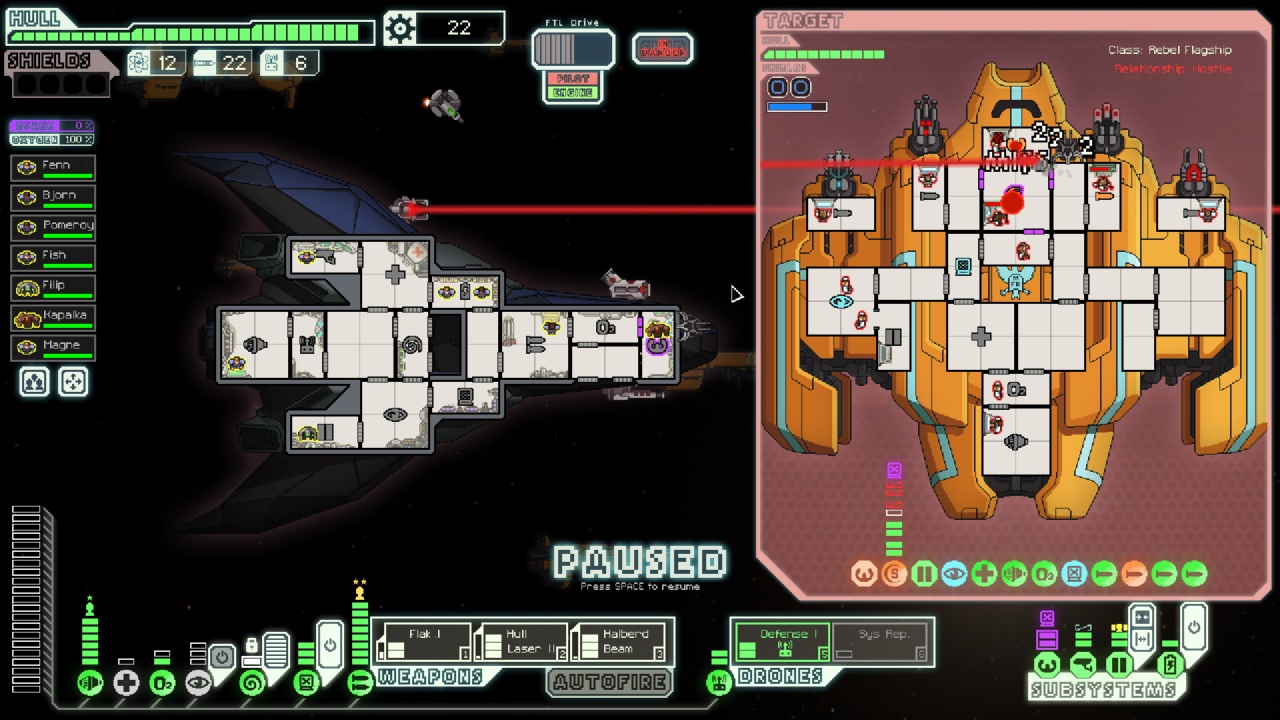
The screenshot above is from the fourth fight, after the first two uneventful ones paid exactly 30 scrap to upgrade cloaking to level two. Usually the top priority upgrade is a second shield bubble, but obviously the Stealth can't do that, so upgraded cloaking is the next best defensive measure available.
Near the end of sector one, a Small Bomb dropped from a fight. Great! Stealth A already starts with the two best 1-power weapons in the game, and the Small Bomb is right up there with them. I happily upgraded weapons to 3 to use it, giving me that much extra chance at crippling enemy weapons before they could fire or FTL drives before they could flee.
On the first jump of sector 2, I bought a map. I will usually do this within the first few jumps of a sector, especially early in the game when you're not passing up much loot by not fighting the mercenary. This was a beautiful decision, revealing a chain of six straight fights leading up to a store. I fought my way through them cleanly, accumulating 90 scrap, enough to afford Shields at the store after selling the Titanium Casing. (This is an important and overlooked detail of navigation: plan and know ahead of time what you want at a store so you can save up precisely for it.)
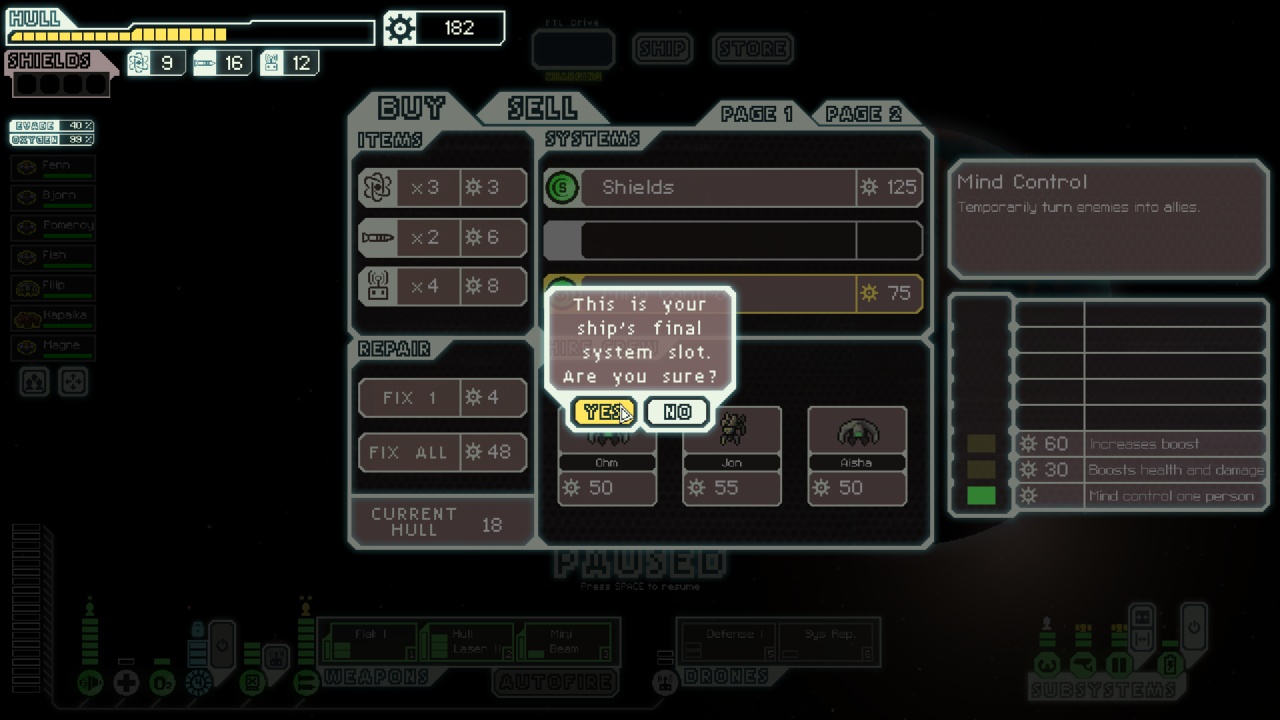
So here's the store:
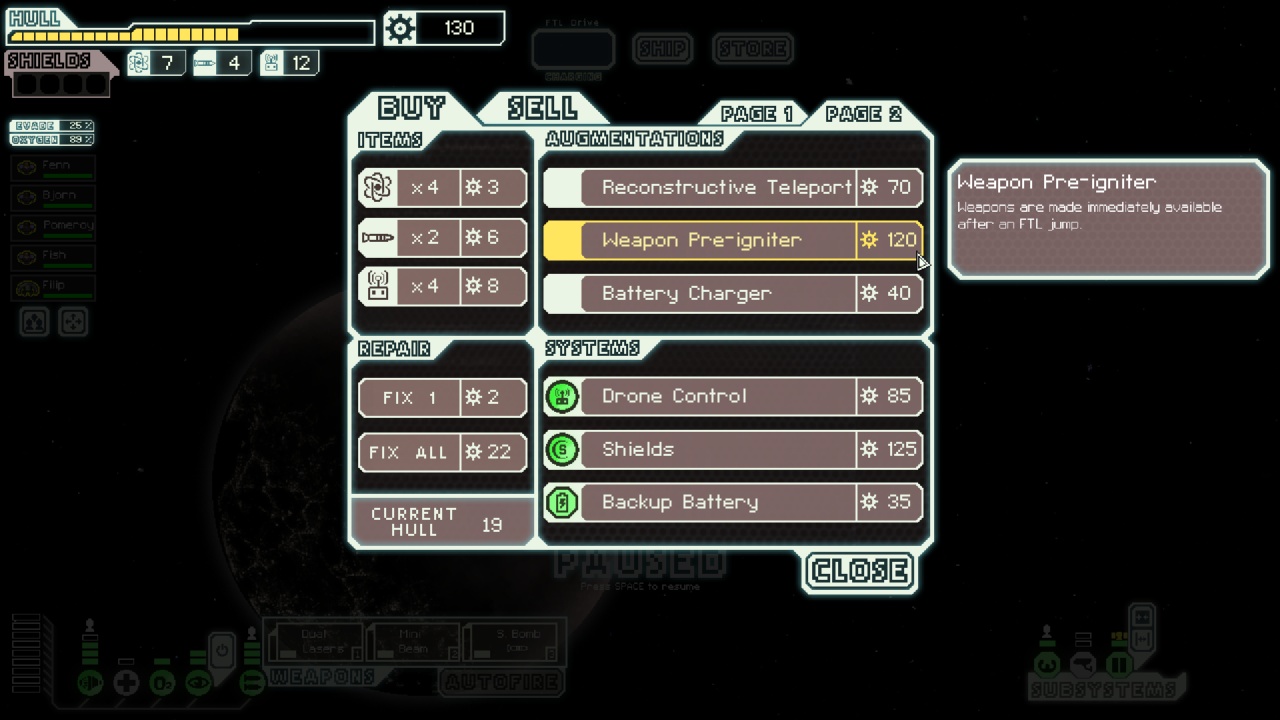
There are the Shields of lifeblood... but check that out. A glorious PRE-IGNITER in sector two! I cheekily jumped on the rare and spectacular treasure. Shields are easy to find later, but pre-igniters don't come around every day.
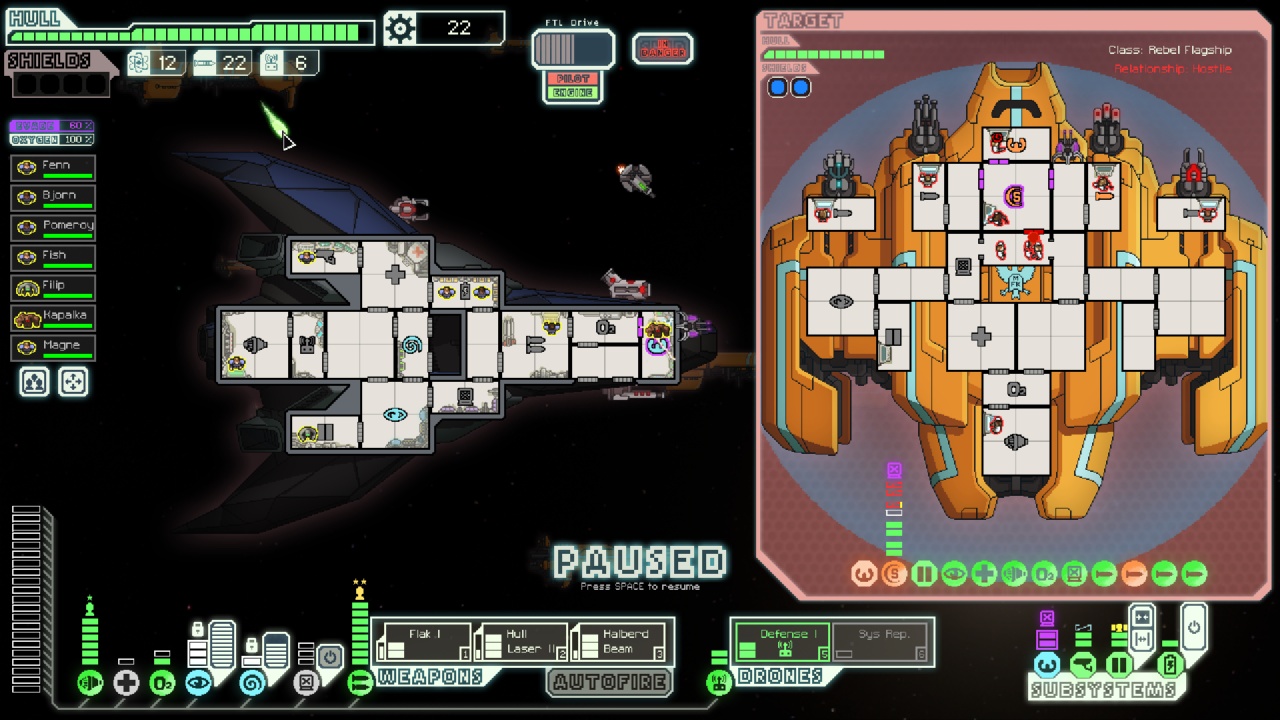
So now with the pre-igniter, I would get two full weapon salvos before the enemy could fire at all. After the pre-ignited shot, cloak to charge up the second. With the deadly accuracy of the mini-beam, and the Small Bomb able to aim for either shields or weapons as appropriate, I'd win most fights before the enemy ever fired. Drones could still hurt, but a pre-ignited shot to the drone system usually alleviated that threat too.
A sector 3 store added Hacking to the mix, immediately upgraded to level two, and shortly later both cloaking and hacking to max level three. When both shields and weapons require no investment, that leaves a lot of scrap available to plow into these side systems.
The combination of max cloaking and max hacking on weapons can actually prevent an enemy from firing permanently, as the systems perfectly cover each others' cooldowns in lockstep.

After cloaking, let the enemy weapons charge for 10 seconds, then drain those back to zero with 10 seconds of hacking. Boom, that's the 20 seconds that the cloaking cooldown needs to recycle. By the time the cloaking expires and the enemy weapons reach 10 seconds of charge again, hacking is ready to go again. When hacking is done, cloaking goes again.
This can be maintained permanently, as long as your timing is accurate and the systems don't get damaged. Obviously this can be disrupted, by something like an attacking drone or ion intruder or pulsar ionization. But the baseline is that no enemy weapon that takes longer than 10 seconds to charge can ever fire as long as you continue this sequence correctly.
In practice for this shieldless run, there were a fair number of enemy weapons that would fire faster than 10 seconds, particularly flak. So I would have to trigger the hacking a bit sooner to avoid that, which would eventually let enemy weapon charge overcome the interlocking cooldowns, about 90 seconds in to the fight. But the Mini Beam dealing four damage a pop should and did win long before that.
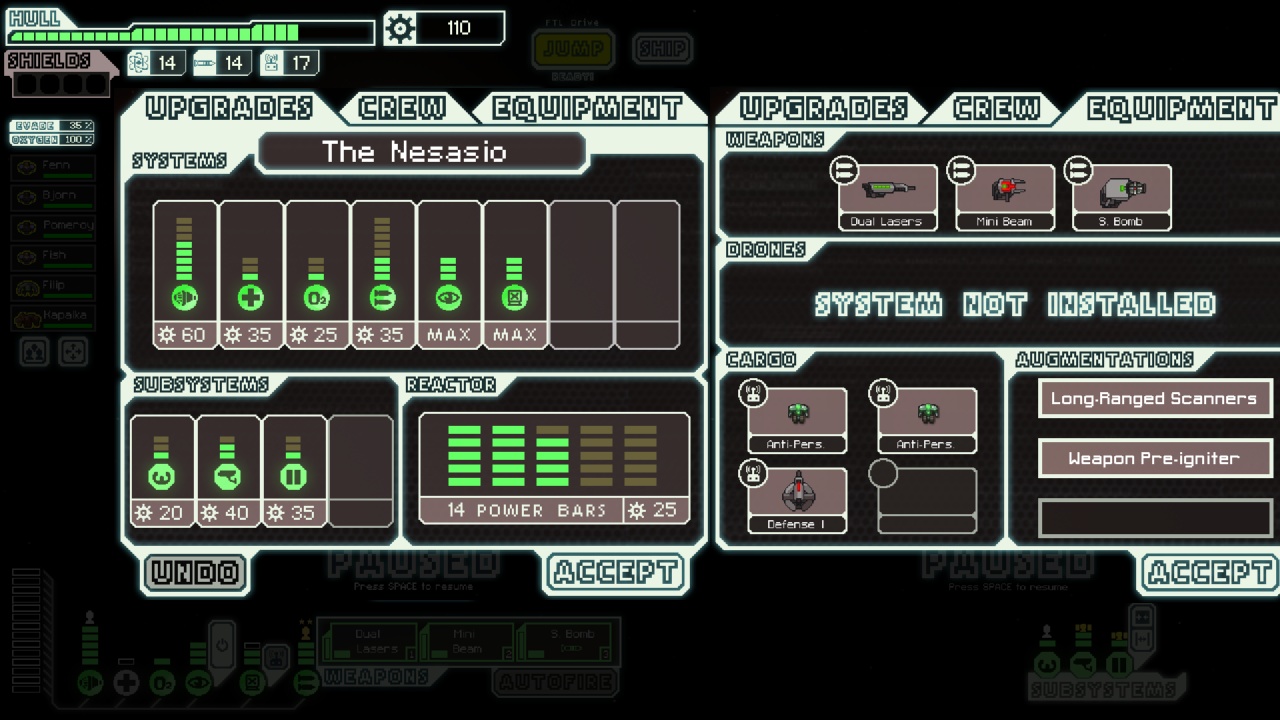
Here's my loadout at the start of sector 5. Now with three-shielded enemy ships with higher evasion, the Small Bomb and Dual Laser wouldn't be so reliable at getting through shields for the Mini Beam to gash. So I hacked shields sometimes instead, which was effective, but gave up that nearly perfect cloaking+hacking lockout of enemy weapons and I took some damage on occasion.
The next store had my next shot at shields... but also a Hull Laser 2 (3 shots for 3 power) which was what I needed to keep up the pressure on enemy shields, swapping out the Small Bomb. Now I was actually thinking about pushing this shieldless run all the way.
And the next store in sector 6 cemented that decision. Once again I declined shields, this time to buy all of a Flak I, Auto-Reloader, and finally the Drone Control system.
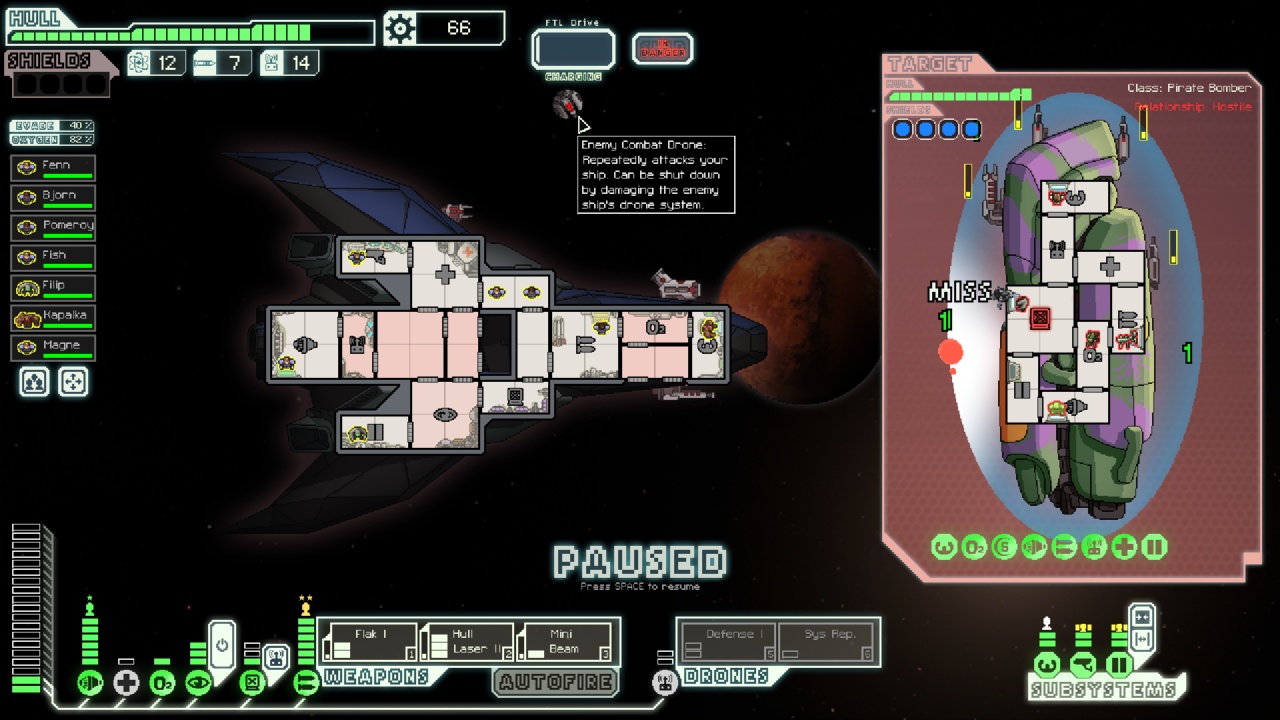
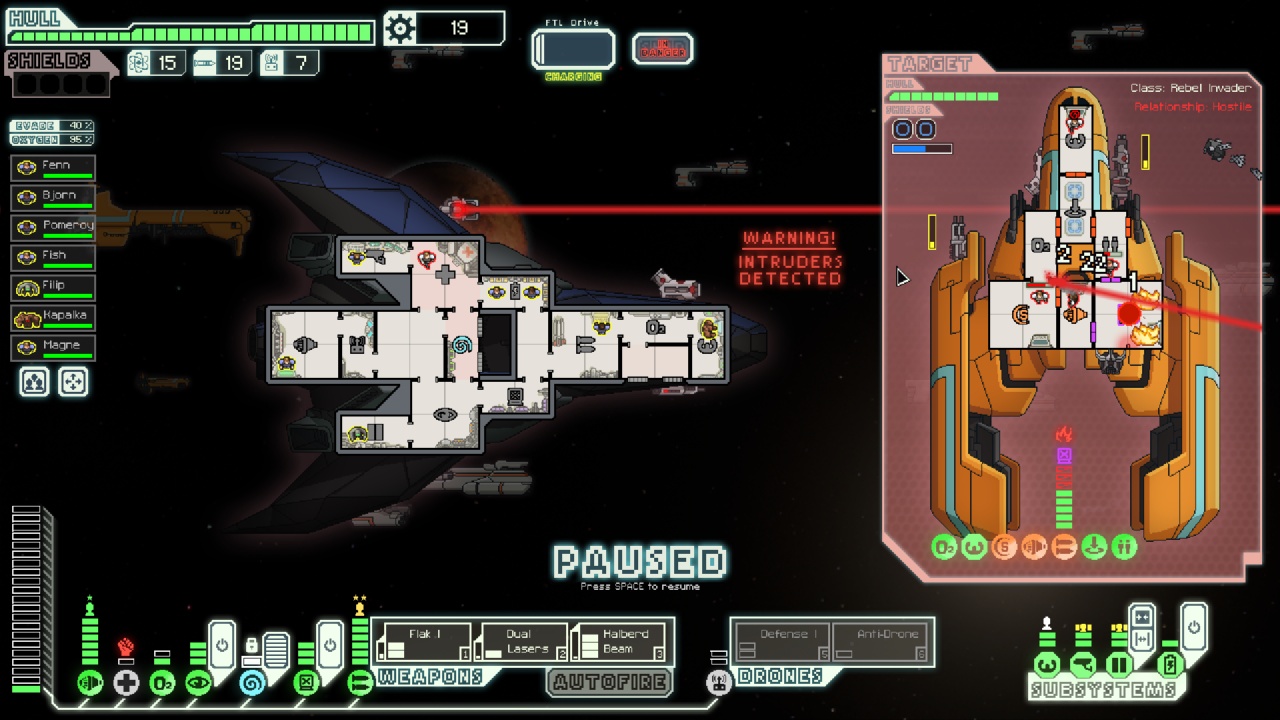
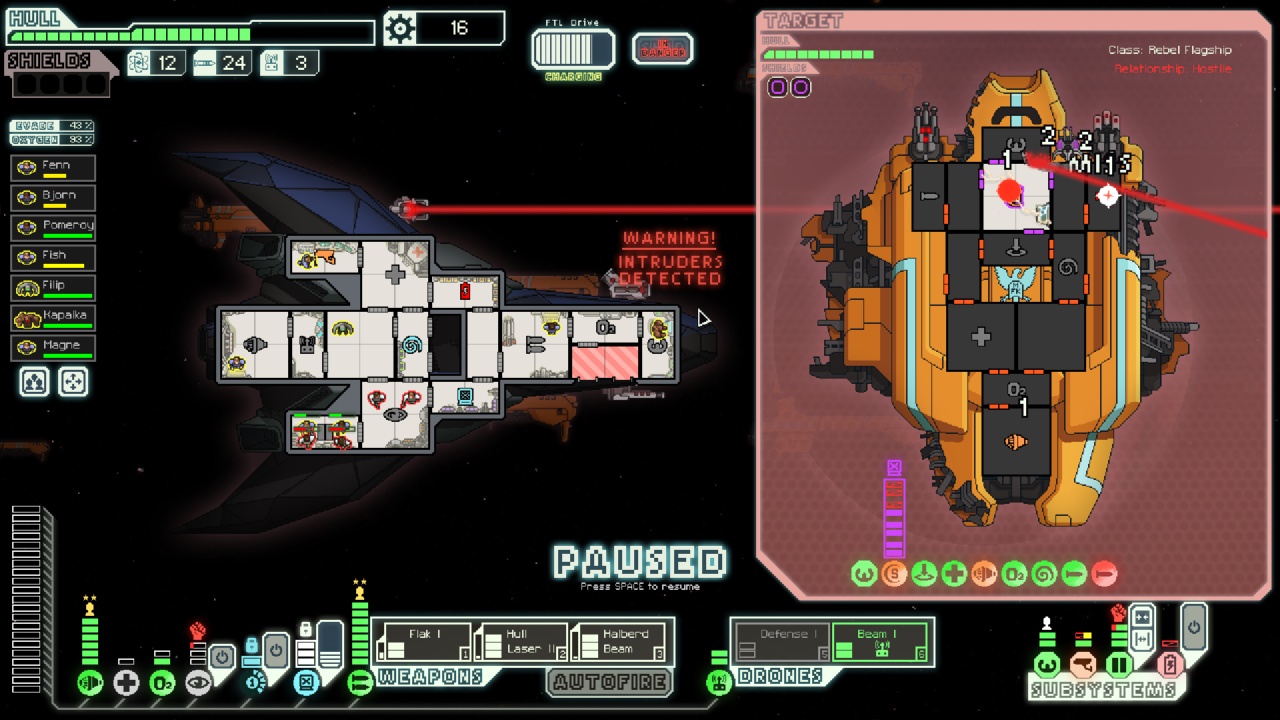
So here's what a tough fight with this loadout looks like. This ship had a Zoltan shield that ate my pre-ignited volley. And four regular shields so I'm going to need to hack that instead of weapons. There's also a combat drone pointed at my naked shieldless ship. So put that tactic from the top of the page into effect once again.
The right move here is DON'T CLOAK YET. See how the drone is aiming for something inconsequential - oxygen. LET IT HIT THAT and don't spend the cloak until we can use it to simultaneously dodge enemy drone and weapon fire.
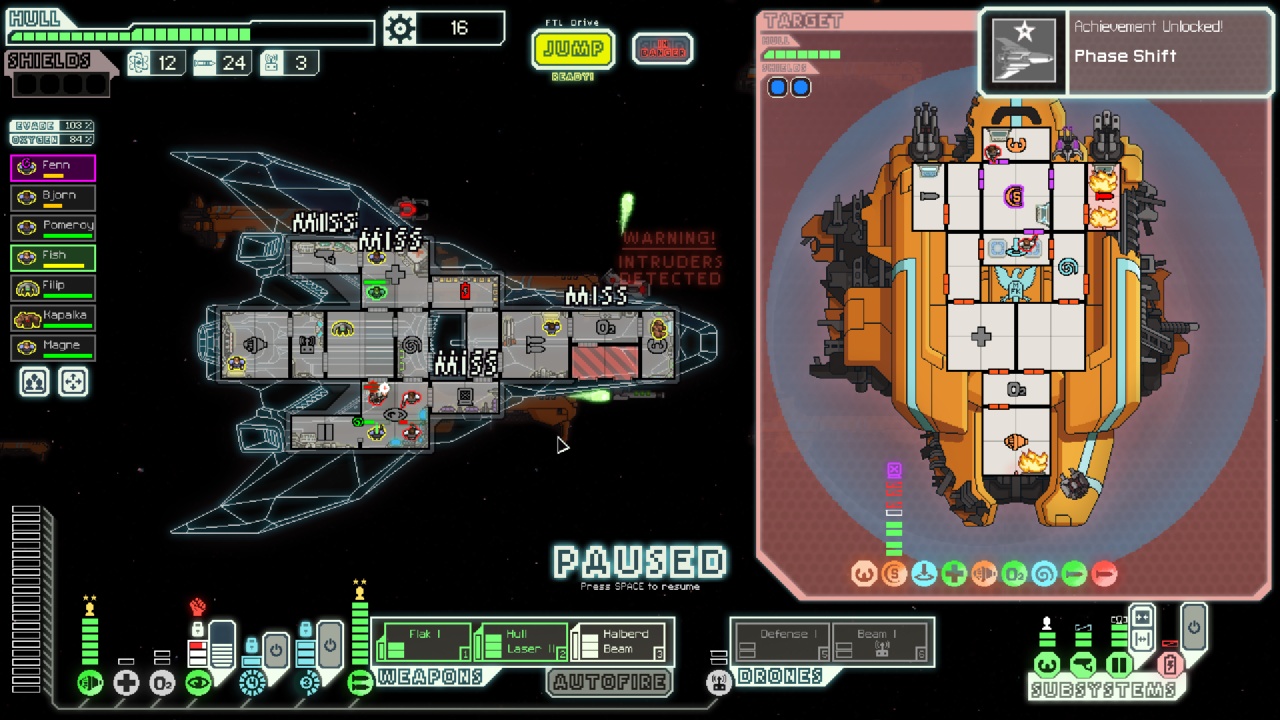
There we go. All three of those enemy lasers just fired, so NOW is the right time to cloak to dodge all of it. Meanwhile, my hacking drone is at work on the shields. I dumped all my firepower into their weapons... and a surrender offer came up. It was low at 22 scrap, but now the enemy was in position to hurt me with that hull beam, so taking that offer was best to avoid the damage. And that's how you get through these tough fights without shields.
Sector 7, here's the last store, and now I'm committed to the shieldless run. Mind Control occupies the last system slot and now we can never buy shields. But of course, shieldlessness means extra scrap to invest in other purposes, and here I bought both an Anti-Drone for flagship phase 2 and a Beam Drone for the flagship's zoltan shield. Always planning ahead.
Notice this is a combination not normally possible. This ship wields all of hacking and mind control for offense and cloaking and drones for defense. Ships can't normally do this for lack of system slots, there's only room for three of the four. Only a shieldless run can put all this together. I certainly had fun with it. The combination of hacking and mind control in particular was nice. (I usually hate MC, but might have to consider passing up drones for it more often.) Hacking doesn't combo all that well with a pre-igniter since it takes the hacking drone so much time to arrive and drain the shields. But MC does, stopping the pilot's evasion instantly for the pre-ignited salvo, and then hacking drains the shields for the second broadside.
Now in fact the aforementioned store wasn't the last, as I found and reached the one in sector 8. That had a HALBERD BEAM on sale and I eagerly grabbed it.
Oh heck yeah. The Halberd Beam is the single best weapon in the game. Sit down Burst II and Flak, you're good but not the king. The Halberd Beam is. It delivers 8 damage from one weapon slot at affordable power and time usage. No other weapon in the game does that. And the Halberd actually kills faster than its bigger brother Glaive. It doesn't matter that the Glaive inflicts 12 damage where the Halberd inflicts 8. Either weapon needs two strokes to kill against the 14-16 health common for late enemy ships. And the Halberd gets to that second charge faster.
The Mini Beam is fantastic too, but doesn't quite have enough punch in the later sectors and takes just a bit too long to kill. It's the most damage/power/time efficient weapon in the game, but just 1 damage across weapons and shields isn't enough to cripple an enemy ship. That second damage from the Halberd makes a big difference, always taking out one shield bubble and a weapon, buying time for that second stroke to kill.
As always, the Stealth ship's Long-Ranged Scanners had found a steady stream of income all game. So it continued here in sector 8, finding just enough scrap to get up to weapons level 8 on the last fight before the flagship. There's my loadout, Flak 1 + Hull 2 + Halberd. Here we go on the flagship.
Phase one was standard stuff. Shoot my preignited volley, with mind control on the pilot to make it all hit, then stroke the Halberd across missile-shields-piloting.
Interestingly, I had to take note of the flagship's triple laser weapon, in flight right there on the mouse pointer. Usually you ignore this and let it hit your shields, focusing on the missile weapon as the real threat. But without shields, the triple laser is actually more dangerous, same damage as the missiles but a defense drone can't stop it.
So I had to cloak right here and now. And... that was it. During the cloak, my hack drained the shields, and the second Halberd slice delivered the kill before the missile ever fired.
Phase two went the same way, fast enough that I didn't get a picture. Launch the preignited salvo with MC for the Halberd across the key systems immediately. Then hack the shields (didn't even need to use the depower trick as the defense drone shot at my flak instead), cloak to earn a weapon recharge, and win on the second Halberd shot. I did take some damage from the drones, about 5, mostly from the beam as my anti-drone shot the combat drone instead.
Phase three, swapped in my beam drone to attack the Zoltan shield. That went down in the preignited salvo plus one more flak shot.
Hack the shields, and here's my first Halberd stroke. I had to withstand one salvo from the laser and missile weapons to save cloak for the surge, but fortunately they didn't hit anything important. Notice the damage to sensors and battery, but none to the important parts of cloaking and weapons and hacking.
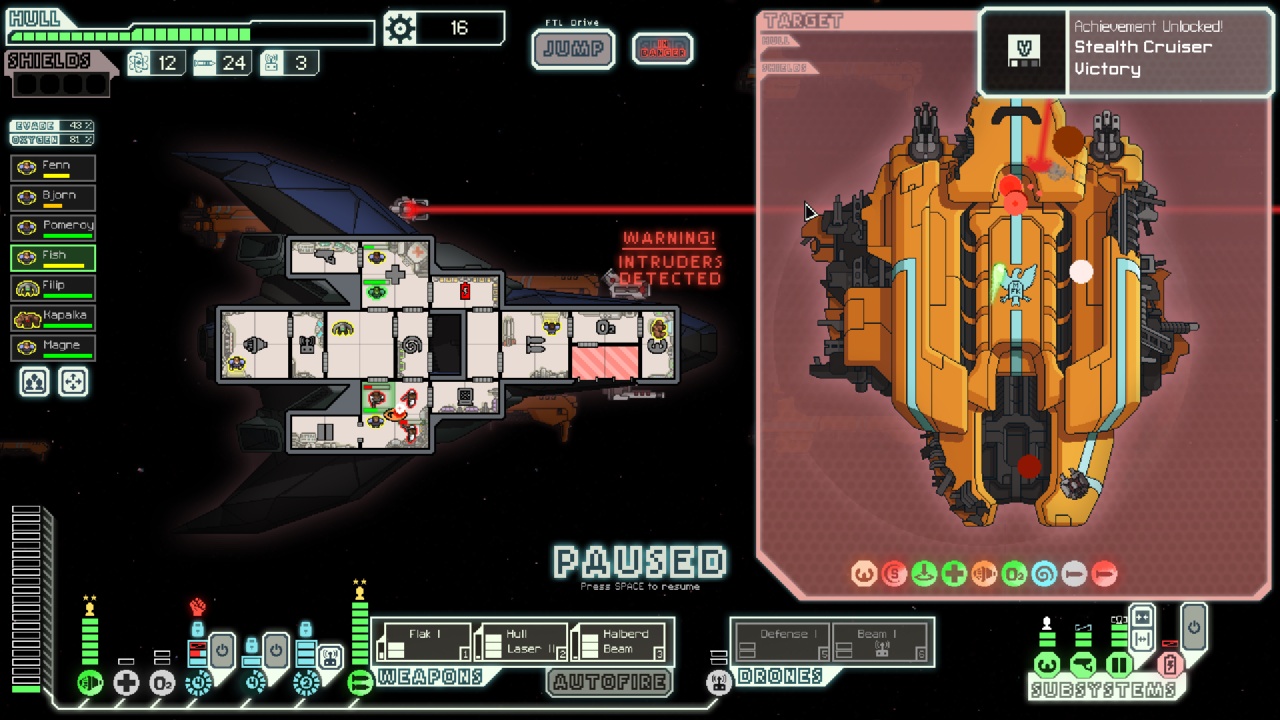
As for the boarders, they're causing a bit of trouble there on the cloaking. I could jump back to base to kill them off in peace if necessary. But that's not a concern because the Halberd is just going to win on the next shot.
There's the cloak past the laser surge, and the Halberd stroked for victory.
So that's how to win a shieldless run on Hard. Max cloaking and hacking go to enormous lengths on defense, and any beam plus shield piercers is enough offense. The Pre-Igniter certainly made things easier, although I could see a run being possible without. I did have the advantage that I wasn't deliberately trying to make a shieldless run, just grabbed the opportunity as all the pieces fell into place.
Here's the stats. (I'm playing with a recently reset profile, hence the achievements popping up and empty score list.)

1926 scrap is typical. On Hard with Long-Ranged Scanners and without boarding, about 1800 is average so this was a bit above, but I didn't have any fantastic drops for sale value. So I had solid but not extraordinary resources or luck in this game, except for the pre-igniter of course.
Thanks for reading, and I'll share more memorable runs as they occur.